by Fiddler 2001 U320 2/12/04
REMOVAL
*STOP* Before starting this installation TURN OFF ALL POWER to this system.
1. The rear camera is accessible by removing the rear access panel located inside the cabinet overhead at the rear of the motor home. This panel is centered on the back wall of the overhead.
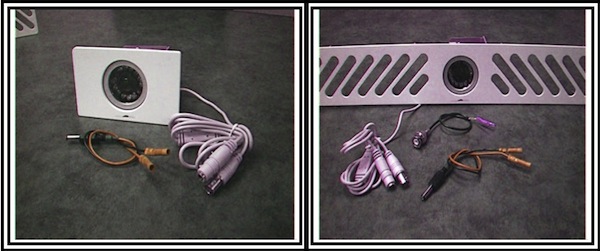
2. After removing the access panel disconnect the camera. Older models have two connectors on the rear of the camera. One twists off by rotating 90 degrees counter-clockwise and pulling rearward. The second connector unscrews counterclockwise.
Cameras with one connector disconnect by pulling rearward on the knurled barrel on the center of the connector and pulling. Both connector types are identified in drawing #03-2169 (provided).
3. Remove the eight nuts (4 on each side of the center) on the rear grill. Gently remove the camera grill assembly bu cutting any silicone sealant around the camera assembly. Remember the camera removes from the outside of the coach.
4. Carefully clean the area around the camera, removing all dried sealant.
5. Dry fit the new camera to make sure it mounts flush against the fiberglass. In some cases, it may be necessary to file areas of the opening to ensure a clean, flush fit.
6. Once the camera is fitted without obstruction and flush against the fiberglass panel have someone hold it in place while someone (inside the motor home) installs the mounting hardware on the threaded studs. Tighten the mounting nuts to secure the camera.
7. Refer to drawing #03-2169 and connect the new BNC video and power connectors (provided). Once connected, connect the cables to the matching cable ends on the new IR camera.
8. Power up the system and make final adjustments (if desired) to the camera angle as required.
The camera can be adjusted at the base bracket as well as at the side mount on the camera.
NOTE 1: The camera is very sensitive. Ultimately the camera must be as close to the grill as possible. If the camera is positioned too far behind the grill it will get a reflection from the grill causing it to darken the picture beyond the desired level. Additionally, positioning the camera into the horizon too much will cause the camera to adjust light levels to the sky instead of the tow vehicle and roadway. For optimum results, the horizon should be just above the top edge of the picture.
NOTE 2: When replacing a movable camera it is necessary to disable the UP/DOWN switch, located on the dash. To accomplish this, remove the two wires from the rear of the switch and connect them together with a suitable connector. This connection is necessary because it provides a continuous ground source for the color camera.