by Mike and Pamala Rash 1997 U320
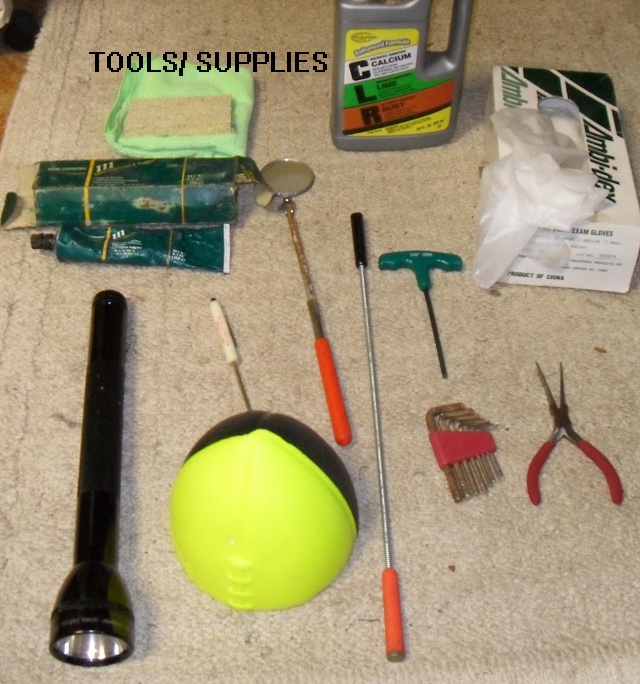
Tool list
- Good flashlight
- Something soft to plug toilet hole
- I use half of a nerf football
- Small instrument screwdriver — flat blade
- Flexible reach and grab
- A small mirror on a stick
- Allen wrench 5/32”
- Needle nose pliers
- Disposable gloves
- Dow Corning 111 silicon grease or another good silicon grease
- Lime-a-way or CLR or plain vinegar
- Disposable sponge or cloth for cleaning
INSTRUCTIONS Without pulling unit off the floor
1. Remove lid that will expose inner works.
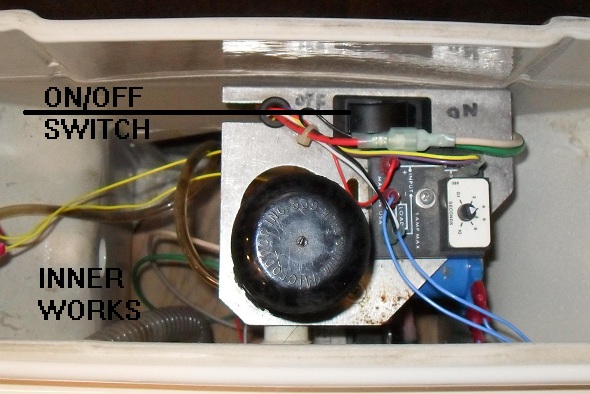
2. Look to see if yours has an on/off switch or wires only that feed 12VDC to the unit.
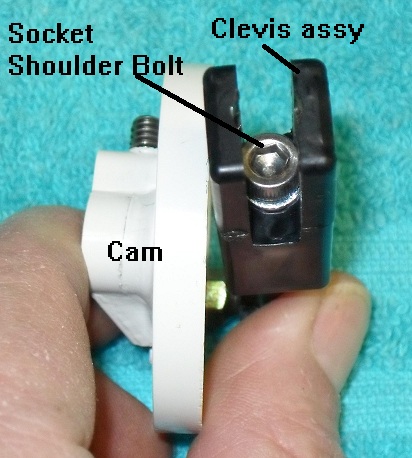
3. Look on the right side of the toilet (facing unit) and you will be able to see flapper crank, clevis assy and timing cam.
4. Once you have these items identified you can start.
5. Before adjusting anything, I highly recommend that you make sure your seal adapter, flapper, flapper sealing surface (black rubber seal) is free of calcium/lime build-up. You can use any number of calcium/lime removers, CLR, Lime-a-way, or plain vinegar. Actuate the flush handle, kill the power with flapper in the open position. With the flapper in the fully opened position, you can put on your rubber gloves and be able to clean the seal adapter, of any build-up. (this is the surface that the black rubber seal mates to, it’s called the seal adapter in your book, and is glued to the porcelain) Put your cleaner on a sponge or cloth rub around on the lip of hopper, let it sit and work, if needed. You may have to do this several times, especially if it’s been a while since it’s been done or you have been in an area with “hard” water. This area is often neglected as most people clean the toilet bowl and flapper face then flush, which leaves the seal adapter to build up calcium/lime. Once you have this completed, feel of the hopper seal, it should be smooth with the seal ridge running completely around the face. You can use your flashlight and mirror to inspect the seal, but the feeling of it works best. It is not smooth, or you can feel a crack, this could be your problem.
Now that you have checked and cleaned the mating surfaces, lubricate the black seal with Dow corning 111 silicon grease or any other good silicon grease. Turn your toilet back on, and fill with water. Is it still leaking?
If it’s just dripping I would give it a day or two and see if it quits. If it’s trickling let’s adjust.
6. Actuate the flush handle, watch the timing cam move. When it gets approximately ½ way around kill the power by either pulling the 12VDC feed or turning off the switch. This will take the tension off the flapper and spring that is located inside the clevis assy. You may have to do this several times before you can get it to stop me from a good spot. Now you can plug the open hole with something soft and round, (remember the nerf football), to keep the stink in the tank and not in the nose. I try to do this with my black water empty, it makes it easier to hear if the toilet is still dripping, after adjustment, plus it helps with the smell.
7. Take a small instrument screwdriver and remove the retaining ring from the clevis pin. This “E” ring is stainless steel, so when you drop it you will have to fish it out with a reach and grab, you will need a mirror to find it. Anything you drop won’t go anywhere except around the base of the toilet because the floor is sealed off.
8. Remove clevis pin, use needle nose pliers, as need be. It will just slip out because you have removed the tension.
9. Look down on the end of the clevis assy between the 2 yoke halves and there will be a socket headed shoulder bolt. Insert the 5/32” Allen wrench and turn clockwise to increase spring tension. Don’t turn more than ½ turn at a time because too much tension and the spring will bottom out, resulting in a broken timing cam, once you flush the unit. The factory says don’t tighten up more than 3 complete turns.
10. Put clevis pin back in, but leave retaining “E” ring off and run the toilet through a couple of cycles to achieve proper water level. Let sit for a while to see if you have gained ground. Listen for drips, you may have a slight drip but not a trickle. If it’s a drip, it may seal off in a couple of days. If the H2O still trickles out remove the pin again and repeat steps 6 & 8, making another adjustment on the shoulder bolt as in step 9. This is why we didn’t install the “E” clip back yet.
11. Once you are satisfied that you have the leaking stopped, actuate the flush handle and kill the power just like in step 6, now you can put that devil of an “E” retaining clip back in place. Needle nose pliers work well for this.
12. If you run out of adjustment, and the toilet is still trickling, you will need to order a flapper replacement kit Part 90066-3, ( this kit includes flapper, hopper gasket, and new bolts), by contacting: Microphor at www.microphor.com
Click on RV/bus
Click on micro flush parts online ordering (you can look at the parts without ordering)
Or you can call 800-358-8280 they are very helpful and will ship to you.
We don’t have any association with Microphor, we’ve just found them very helpful.
13. When or if your mh sits for several months you should put silicon grease on the black ring to help prevent it from drying out. We have found that leaving our flapper in the open position helps reduce problems and extends the seal life. Yes, once again place that half nerf football in the hole to reduce odors.