U Line WH95TP
Foretravel 1995 U300
Performance
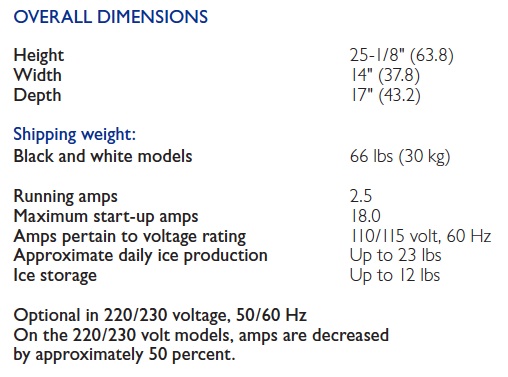
• High output daily ice rate of up to 23 lbs and storage of up to 12 lbs of crescent ice (1/2″ W x 3/4″ H x 2-1/2″ L)
• Conserves energy by using less electricity than a 75-watt light bulb
• Uses under 3 gallons of water to produce 25 lbs of ice
• No drain required makes it easy and inexpensive to install and requires only a 1/4″ outside diameter water line
• Manual defrost maximizes ice making potential
• 220-volt model available with a 4 – 6 week order lead time
Interior/Exterior
• The vinyl-coated cabinet helps withstand tough marine environments
• Corrosion and UV resistant marine grade hardware provides better product longevity in harsh environments
• Aluminum framed door with durable aluminum handle weathers outdoor elements
• Travel pin included for optimized, hygienic and safe at-sea travel and storage
Integration
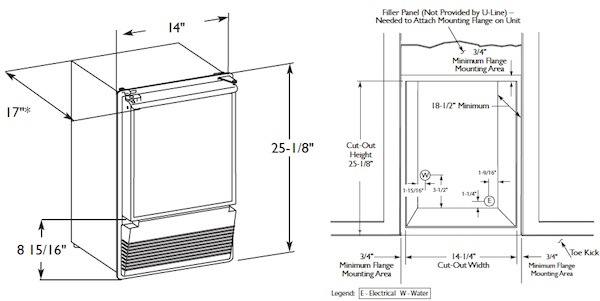
• Field reversible door with zero clearance door swing simplifies installation
• 1/2″ flange flush to cabinet
• No additional clearance around sides, top or rear of the unit is needed for ventilation
• The sleek and contemporary look provides a very clean, high-end aesthetic
• Do not obstruct front grille airflow
• For proper installation and cut-out dimensions, see backside for details
U-Line Ice Maker B1-95 Repair
U-LINE CLEAR ICE MACHINE CLEANER 6 – 1oz. packets per box with instructions. For use with many Ice Makers and all U-Line Icemakers, Not for use with 12 cube ice makers. (part number 41978) If the ice machine cleaner is not working you may want to look into getting a new ice Maker #402
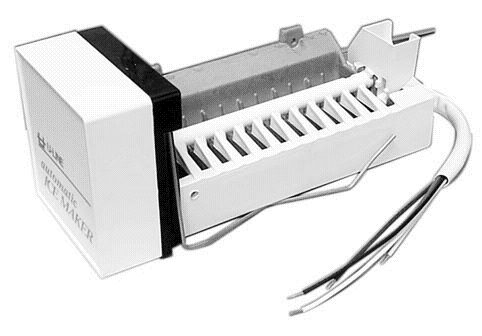
If your U-line B1-95 ice maker freezes to ice, but fails to eject (more than once or twice), your mold heater has failed. Not only had this happened to mine, but the plastic coating in the mold had failed. The aluminum corroded and it was just a mess.
If your ice maker works, but you see ‘junk’ or yellowish sand looking debris in the ice, you may have the plastic coating failure problem. If you stick your pinkies in the mold and it feels rough you also need a new assembly.
U-line makes a complete replacement assembly UL402 – $150.00 or less. (Replacement Part Number UL67004-S) It comes with a tube of Alumilastic heat sink/sealer and instructions. I get a discount where I bought my motor home so it was $126.00 plus UPS ground shipping. This is a 2 to 3-hour job with minimal skills required.
Tools: Phillips and straight screwdrivers, 1/4″ wrench, nut driver or socket + extensions and ratchet. Crimper for bullet connectors. Ratcheting caulking gun. Squarehead screw adapter/driver. Diagonal cutters. Nail or small Allen wrench for alignment. Flashlight/drop light.
Additional parts: 5 bullet crimp connectors, mineral spirits or ‘auto-prep’ spray for cleanup.
Prep: Place plastic/towel over floor/carpet if you plan on doing the work in the motor home.
Remove unit
1. Remove lower plastic cover (1 square drive screw on mine).
2. Remove 4 Phillips screws around front trim (2 per side)
3. Remove 2 square head screws inside bottom lip of unit – this anchor
4. Lift unit slightly to clear feet and slide it out. Unplug power. There is no need to disconnect the water source as long as there is plenty of tubing to maneuver the unit – unless you want to do the job
Rear disconnections
1. Remove the rear cover (6 1/4″ hex/slotted screws). Lay it flat behind the unit.
2. Clip the 5 wires to the ice maker/mold heater assembly. Relax – there plenty of wiring and its all color-coded!
3. Remove putty around the capillary tube, slide-out sensor wire from the tube.
4. Remove fill line (just pull it straight out).
5. Remove putty around the wiring bundle.
Remove ice maker assembly.
1. There are 3 1/4″ hex head self-tapping screws on the bottom side of the assembly.
2. There are 2 1/4″ drive/slotted screws that anchor the unit to the left side of the unit. Front one is difficult to see – I did it by feel.
3. After removing these, it comes right out.
The clean mounting point, install the new Alumilastic.
1. The base of the mount has the old Alumilastic that has to be removed.
(Messy part)
2. It will have hardened to a brittle clay consistency
3. Invert the new mold heater unit. Apply 1/4″ of Alumilastic to the base of
Install a new unit.
1. Bend ends of new wiring 180 degrees or they will catch on the foam
2. Carefully guide the new wiring in while keeping the Alumilastic from getting on everything. Set the unit in place, making certain you have
3. Using your nail/Allen wrench, align the unit to the lower plate mounting holes. It’s tough – start with the right front, then do the rear and the left front. The mounting plate has a radius bend on the left side and it will give you grief. Plus the self-tapping screws are short, so with the Alumilastic in there you have to kind of compress it to get
4. Reinstall the 2 left anchor screws. Clear up excess Alumilastic with the mineral spirit or prep-sol and rag.
Rear connections
1. Reinstall the capillary line into the tube. I trimmed the tube back a 1/4″ as it looked like it was sticking out too far and would interfere
2. Reinstall water fill. Compress putty.
3. Reinstall putty around wiring bundle.
4. Strip back and reconnect wiring – check those crimps!
5. Put the back on the unit. Plug power in.
Reinstall
Match the power line and water lines as you push it back in.
Mine was making ice in under an hour. The factory settings were perfect for the ice cube size. Pat yourself on the back – you just saved yourself about $150.00 depending on what someone would nick you for this simple job. Dave Head 93 U280 36′