The purpose of this is to inform you of the designation of the lights in the Zip Dee Auto Awning Control Box. These lights will tell what inputs or outputs the Control Board is sensing.
Input Lights
X0 – Remote has called for open or switch in box has called for open
X1 – Remote has called for close or switch in box has called for close
X2 – Manual motor switch called for close
X3 – Manual motor switch called for open
X4 – Emergency Stop With Remote
X5 – Air Pressure Above 80 psi ( Lit when above 80 psi )
X6 – Ignition Relay ( Lit when ignition is off )
X7 – Anenometer ( Wind Sensor not applicable)
Output Lights
Y0 – Motor Closed
Y1 – Motor Open
Y2 – Main arms extended ( Solenoids 4R and 4F )
Y3 – Push off’s extending (Solenoid 7)
Y4 – Locks opening (Solenoid 8)
Y5 – Not used
Window Awning Spring Replacement
AWNINGS BY ZIP DEE INC
A. TO REMOVE PRESENT SPRING:
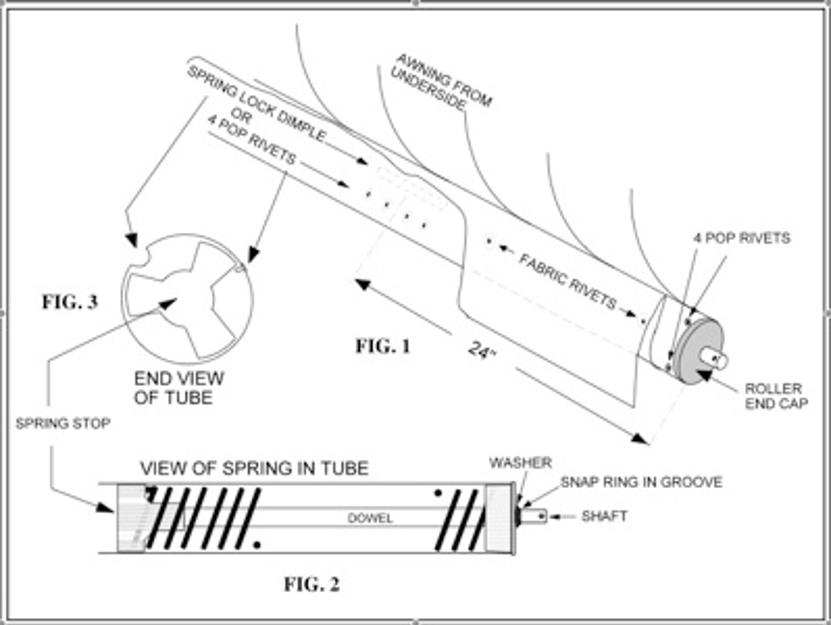
1. Drill out 3 rivets in end cap (#20 or 3/16 drill).
2. Pull out spring assembly using vise grips.
Grip shaft and pull with twist motion to by-pass fabric rivets.
B. TO INSTALL SPRING:
1. Line up the space on the spring stop with fabric rivet so you can insert spring without hitting rivets.
2. Insert spring into tube. Drill and secure end cap using #20 or 3/16 drill and 5/32 x 3/16 pop rivets.
3. IF NECESSARY, go to Step “C”.
C. TO SECURE INSIDE CASTING:
1. Check tube for spring lock dimple. Shown above Fig.1.
2. If not there, then drill 4 holes 1/4″ apart as shown in Fig.1 and insert sturdy pop rivets (lift
3. Wind-up as per instructions on reverse side.
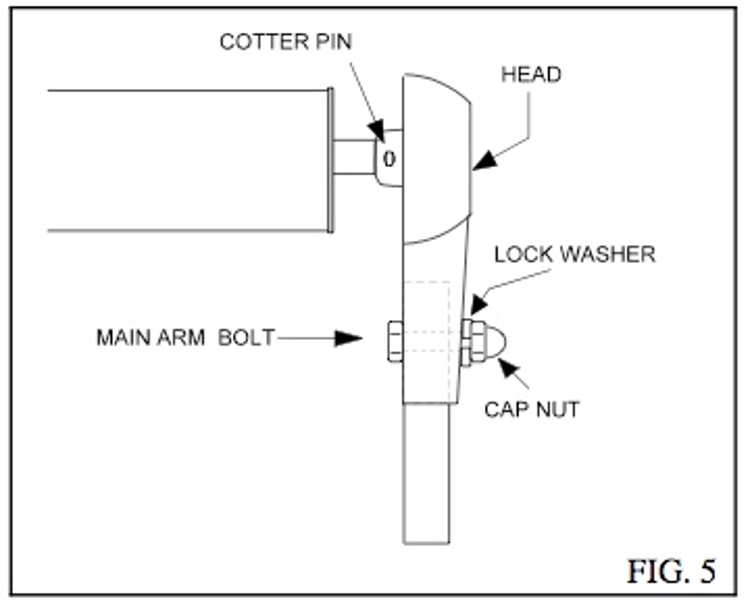
INSTRUCTIONS FOR WINDING TORSION SPRING The single torsion spring is wound by turning the head casting clockwise (from outside, facing the head ), using the support arm bar as a lever (see Fig.4). Insert the bar into the head and secure it in place with 1¼” bolt, lock washer and cap nut (see Fig.5).
Wind the spring according to the awning size, using the guide below:
5′ or under -18 turns
6′ to 10′ – 10 to 13 turns
10′ to 17′ – 15 to 17 turns
17′ to 21′ – 18 to 22 turns
Then swing the assembled arm to the coach and bolt onto hinge.
Now test the spring tension and adjust accordingly. The awning should roll up and snap closed firmly. Because of variations in spring temper, you may have to add or deduct a few turns to reach the right tension.

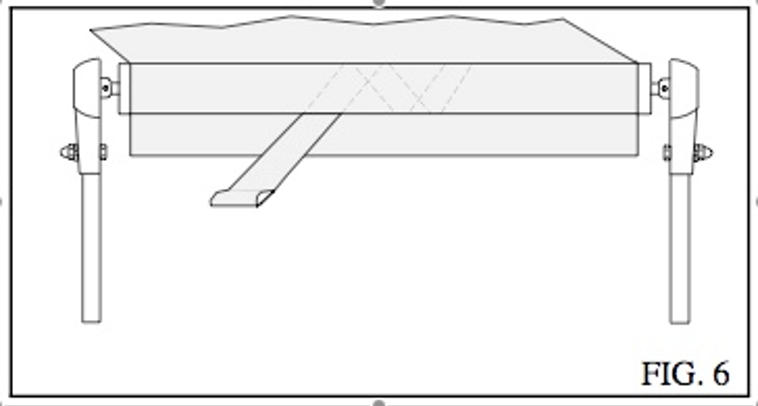
Using the pull tab to control speed allow the awning to roll closed. Spiral the tab as shown in Fig.6 to prevent cloth build-up. Release the tab when the roller is about 4 inches from the coach, allowing the awning to snap closed.
When closed, there should be an even amount of exposed roller at either end of the awning. If not, unroll and close the awning again, giving the roller a lateral push in the directions needed.
Please read the Owner’s Manual carefully. It contains important information regarding the care and treatment of your awning. For safety, always close the awning when the vehicle is left unattended or when weather threatens.