I finally got around to disassembling the old valves to see if I could find out why they were misbehaving and here is what I found.
1) crank up the engine and build air pressure so I can raise the coach
2) block the 4 corners with the 2×2 tubing and chock a wheel
3) dump the air so I can take out the existing solenoid
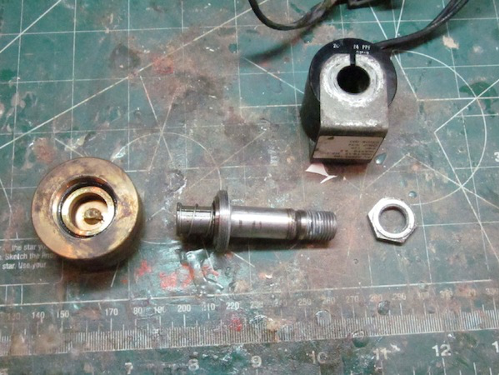
The valve is a simple electromagnetic NC (normally closed) valve. When power is supplied the valve is opened and when 12DC has removed the valve closes with its internal spring.
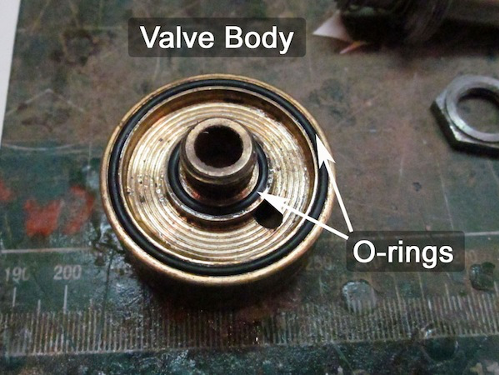
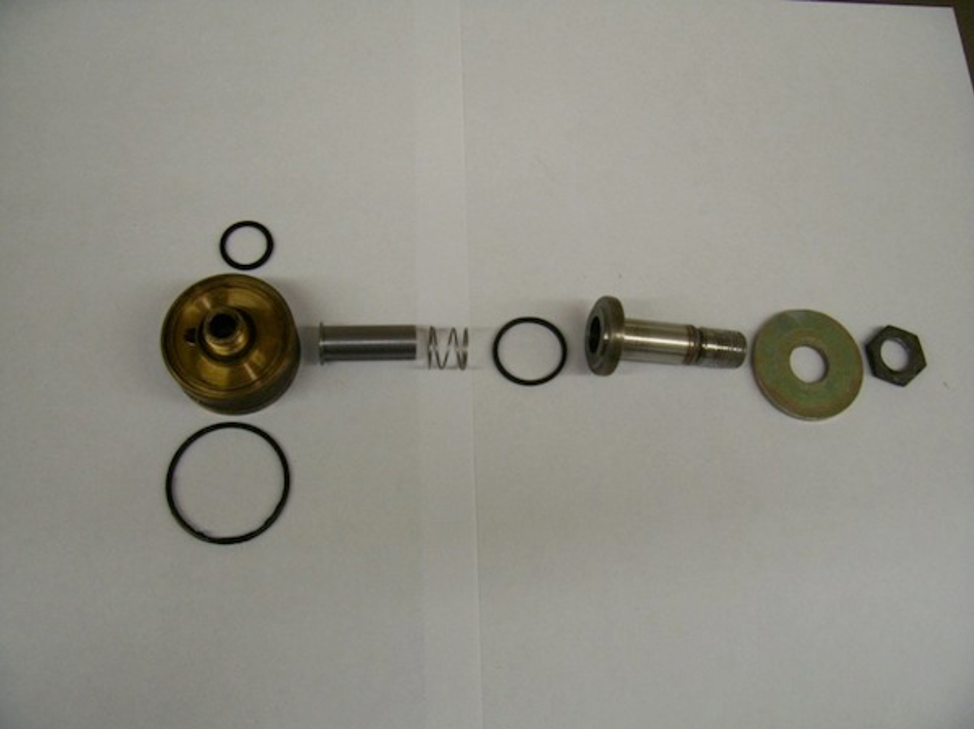
The valve stem is screwed on to the brass body, it seats on an internal O-ring to seal the stem and body interface. Inside the stem is a simple spring-loaded piston with a compliant seal on one end. The spring pushes the compliant seal on the end of the piston down on to the seat in the brass body to close the valve. Power to the electromagnet pulls the piston off the seat and allows air to flow.
Once dissembled I could immediately see that there was some “bonus” material on the brass seat. This was preventing the piston from being able to make a proper seal, resulting in a slow leak. Yup good old Teflon tape from somewhere had made its way inside the valve body.
One note: The depression in the compliant seat did not appear to be perfectly concentric on the piston face. This may make the disassemble / clean / reassemble difficult in that may not allow the seat interface to seal properly depending on how you put it back together.
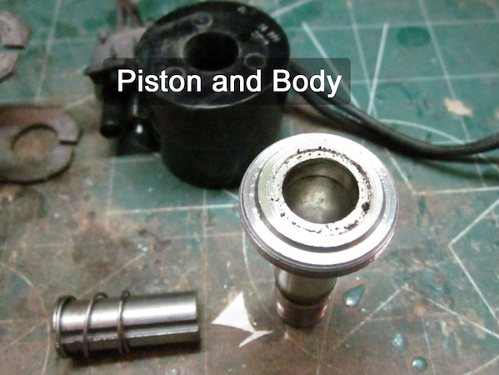
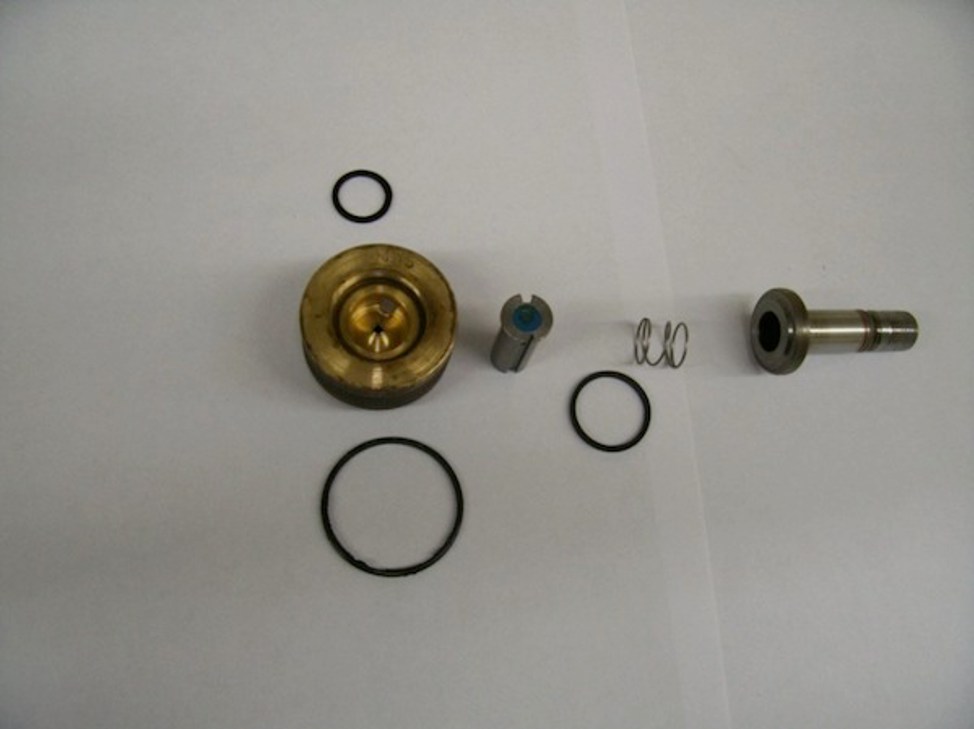
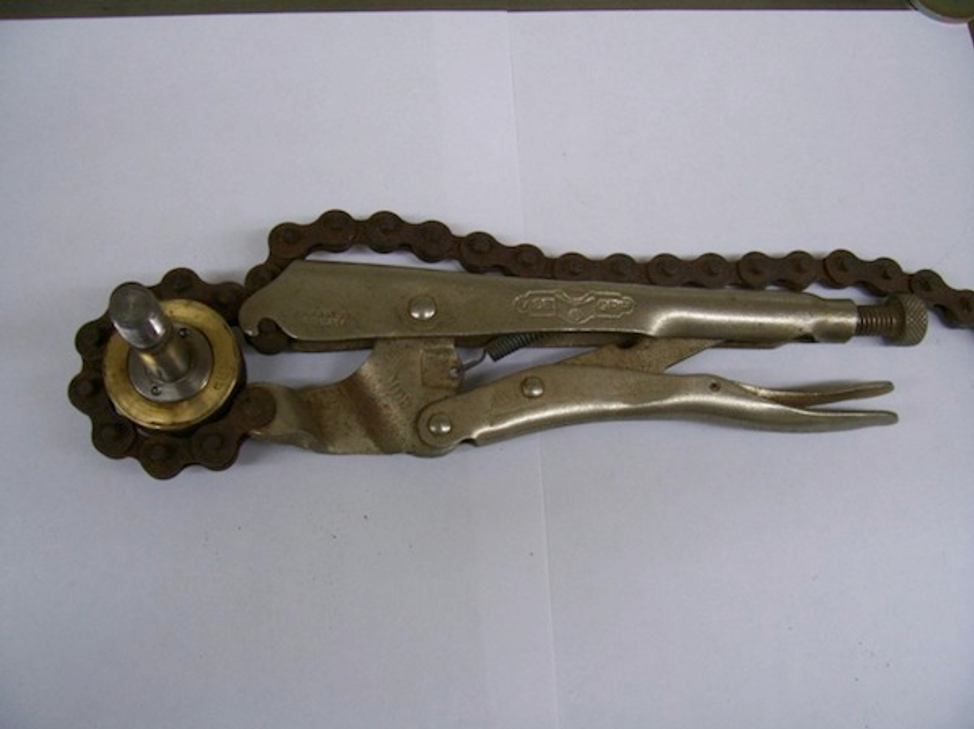
Valve Body Disassembly -The valve stem/piston unscrews from the brass body

Piston – The piston is spring-loaded against the valve seat. The piston floats in the body
Piston and Body – You can see the debris that is on the valve seat. This prevented the piston from properly sealing on the seat. RAP 6554 “O” Ring Kit
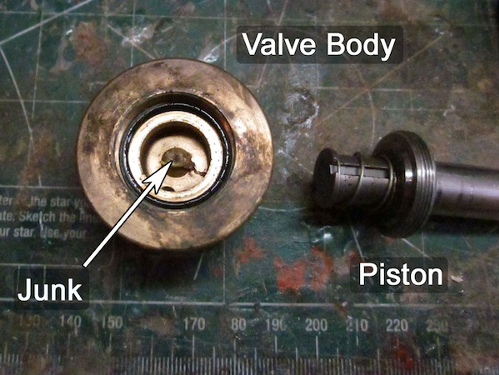
Piston and Body – You can see the debris that is on the valve seat. This prevented the piston from properly sealing on the seat.
Piston – Another view of the piston and body, some loose dirt is visible
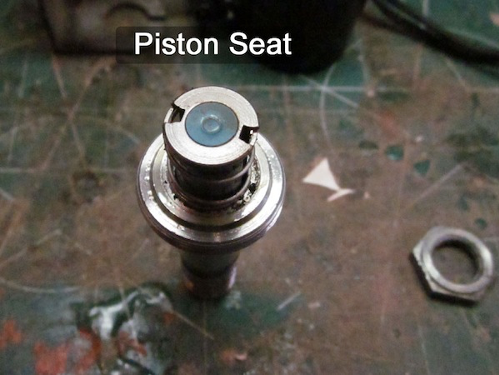
Piston Seat – The end of the piston has a compliant rubber face that seals against the seat in the brass body
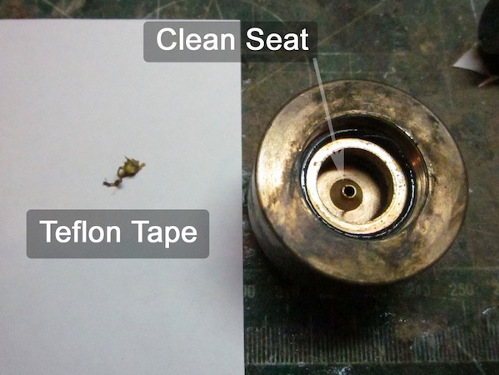
The Culprit – This clump of tape was found in the valve seat
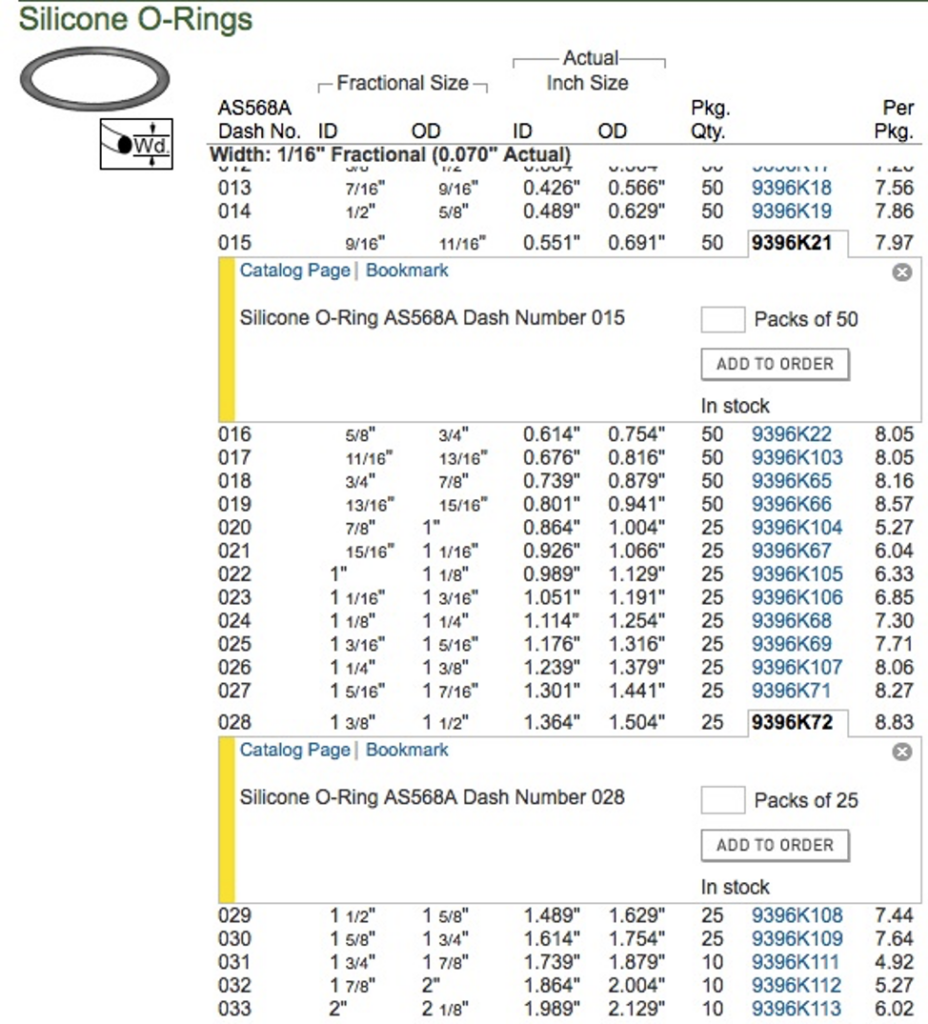
We got the official HWH RAP6554 kit today (about .65 for each o-ring) and I measured them with my vernier dial calipers.
I came up with a cross-section of .068 which correlates to a 1/16 0-ring. A 1/16 O-ring is listed as .070 actual on the AS568A chart.
The small one I measured as .688 OD which corresponds to a #015 which is listed as .691 OD on the AS568A chart
The large one I measured as 1.498 OD which corresponds to a #028 which is listed as 1.504 OD on the AS568A chart
So I think we can pretty much confirm that those are the proper O-rings.
O-Rings and Lubricants
There are some o-ring materials that are not compatible with Vaseline petroleum jelly (same is true for silicone grease on some silicon o-rings) Reading from the O-ring design and materials guide, they recommend it as safe to use on:
Hydrocarbon-based materials, such as petrolatum. As a clear to yellowish semisolid, petrolatum is better known as petroleum jelly (Vaseline®), but it is also available in liquid form. Petrolatum is typically suitable for use with
a) Nitrile (the most commonly used elastomer for O-rings and other sealing devices. Also known as Buna N)
b) Chloroprene (often referred to by the trade name Neoprene)
c) Polyurethane (Adiprene, Estane, Millathane, Morthane, Pellethane, Texin, Vibrathane)
d) Silicone (general usage)
e) Fluorosilicone (fluorovinylmethyl silicone rubber)
f) Fluorocarbon (Viton)
You can also use the following site to check for chemical compatibility with various seal materials: http://www.hitechseals.com/ by Steve and Michelle 2003 U320 40′
I finally found the right rear slow air leak that has been a problem for over a year. It is the “lower” (physical location middle) solenoid for that side on the rear six-pack. I was able to hear air leaking out of the exhaust port using just the tube part of a cheap mechanics stethoscope.
I had previously used a soap solution on that port but didn’t see any bubbles. I Have found out that with even a leak detector soap, it may take several attempts to get a film across the port that will blow bubbles.
Removed the solenoid and disassembled it hoping it would be just some dirt or O-ring. It seems to be the plastic seat on the piston or armature that retracts when the coil is energized. Tried boiling just that part in water for 15 minutes to soften the plastic and maybe reform it. That reduced the leak but didn’t stop it. I can get a new valve from HWH for $98.88 + shipping. May do that tomorrow after I talk to FT and HWH. I can get an O-ring kit p/n is RAP6554 but I don’t know if individual parts are available.
One should be careful to not tighten the valve too much as it is brass and aluminum. The coil and cover are not shown as I did not unplug the electrical connection.
I think I have fixed my leaking 6 pack solenoid valve. All the airbags/springs stayed fully inflated last night with the system turned off and system pressure only dropped 10 psi in 18 hours. Didn’t buy a new valve, used my woodturning lathe to smooth the blue plastic seal by removing about 1/64 to 1/32″ of material. My turning tool was a square cut hardened steel nail held with vise grip pliers. The end of the nail was ground to form a scraping type cutting tool. One could do this also on a machine lathe. I did replace the 2 o-rings with new ones found at a plumbing supply. I hope this is my last post on this subject, but if it starts leaking again I will let you know.

Jerry Whiteaker 96 U270 36′
if you’re looking for a possibly better o-ring (since it sounds like they fail too often) this might help:
1. Find the size of the o-ring in the attached chart. (I doubt HWH had custom o-ring sizes made) This will be a 3 digit number.
2. You can now go to any supplier (local hardware, catalog, etc) to find your o-ring by material and this size.
3. Alternatively in catalogs like McMaster-Carr, there’s such a large selection that you might want to try a different material.
Buna-N and neoprene are the most common and cheapest (probably what you get a local hardware store). Viton is much better. Then there are a bunch of other materials with various pluses/minuses -I’ve seen silicone used in engine applications. I would try to figure out why the existing o-rings are failing: cracking?, getting soft due to oil exposure? Getting hard due to temperature? and try to pick a new material that will perform better in that area. This chart might help in choosing: McMaster-Carr
You might also need to choose a hardness – I would try to match to an original (unused) o-ring. You’ll probably have to buy a much larger quantity than you need but the cost will still below unless you choose a real exotic material.
Another thing that helps is using an o-ring lubricant when installing – this will help it seat properly and prevent installation tearing since it looks like the valve body threads onto the manifold (i.e. twisting).
One more important thing: the mating surface must be kept scratch-free. Aluminum and brass are soft so be careful when handling the parts.
Bear in mind that you’ll be experimenting to some degree but it’s the only alternative if you don’t like what the OEM keeps feeding you. Hope this helps. John & Tina Fitzgerald 1991 U300
I found O rings at an Ace hardware store, They are both 1/16 wall O rings, # 15 (.691OD) and # 28 (1.504OD). I used a little silicone grease on them. They matched the ones in the HWH kit. John Duld 1995 U320C SE 40′
Grainger O-Ring, FEP w/Silicone, AS568A-015
Grainger O-Ring, Viton, AS568A-028, Round
Internal “O” Ring AS019-90N Nitrile Oring (AS568-019 Size 0.070 CS x 0.801 ID)