by Stant Manufacturing Inc
The radiator cap is a very important part of a vehicle’s cooling system, yet it is often overlooked when troubleshooting overheating or coolant loss problems.
Consider the radiator cap’s fourfold job:
1. It’s the filler cap through which coolant is added to the cooling system. Although the cap does not have to be removed to check the coolant level inside the radiator on most passenger cars and light trucks today (that’s done by simply checking the level in the coolant reservoir), it must come off when the coolant is changed (every 2 years is recommended).
The “earless” caps that are original equipment on many vehicles can be very difficult to remove. That’s why Stant makes a unique easy-grip, Swiv-el® cap. The cap is designed so its internal parts swivel as the shell is turned, making the cap much, easier to install and remove.
2. It raises the boiling point of the coolant to prevent overheating and coolant loss. Pressurizing the cooling system raises the boiling point of the coolant the same as a pressure cooker raises the boiling temperature of the water.
A 50/50 mixture of ethylene glycol antifreeze and water normally boils at 227 degrees F.; with 4 lbs. of cap pressure, the boiling point goes up to 239 degrees F.; with 7 lbs. of pressure it rises to 248 degrees F., and with 14 lbs. of pressure it is increased to 263 degrees F.
3. It’s a pressure relief valve that prevents a dangerous buildup of internal pressure within the cooling system. When an engine is shut off, a heat soak period follows during which pressure can build within the cooling system. The cap vents this pressure by allowing a small amount of coolant to overflow the radiator into the coolant reservoir. This prevents damage to the engine and the more vulnerable cooling system components such as the radiator, heater core, hoses, and water pump seal while preventing the loss of coolant that escapes from the radiator.
4. It’s also a vacuum relief/siphon valve. As the engine cools, the coolant inside the radiator and engine, along with any vapor pockets that may have formed, begins to contract. This creates a vacuum within the cooling system. The vacuum relief function of the cap allows coolant to be siphoned from the reservoir back into the radiator to maintain the proper coolant level.
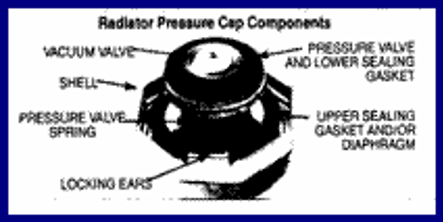
Cap Construction
Radiator caps are pretty simple in appearance, but looks can be deceiving. Each part of the cap performs a special function:
Under the top of the cap is a spring disc diaphragm (and upper sealing gasket on closed system caps) that seals against the top of the radiator filler neck and provides friction to keep the cap from working loose.
The big spring is what maintains pressure on the coolant. The spring holds the pressure valve and lower sealing gasket against the base of the radiator filler neck to raise the coolant’s boiling temperature and to keep it from escaping. When the pressure rating of the spring is exceeded, the pressure valve opens the venting coolant into the overflow reservoir.
The lower sealing gasket is what keeps the coolant where it belongs. This gasket must be in excellent condition for the cap to seal tightly and do its job. If cracked, age-hardened or damaged, pressure and coolant can escape, allowing the engine to overheat.
A vacuum valve at the bottom of the cap allows coolant to be siphoned back into the radiator when the engine cools down. This keeps the radiator full, which helps prevent overheating and the formation of steam pockets. On many domestic passenger car applications with pressure vent-type caps, the vacuum valve also vents pressure when the cooling system is under a light load. This allows the cooling system to operate at atmospheric pressure until the expansion of coolant and the creation of pressure in the system closes the valve.
Two types of Vacuum relief valves
To better understand the role of the vacuum relief valve, let’s look at the two basic types: the “normally closed” or “spring pressed” type, and the “open’ or “weighted’ type.
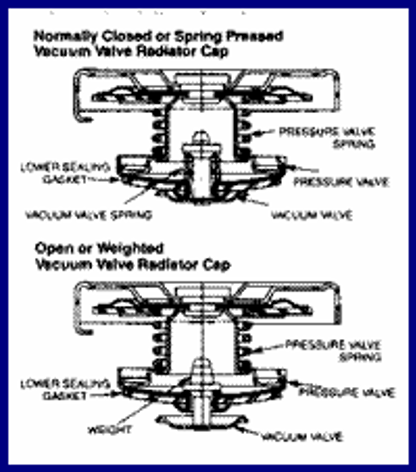
The normally closed type of vacuum relief valve is used in a “Constant pressure” type cap. With this design, the vacuum valve is held shut by a very light spring, creating a totally sealed system. When the engine is started and begins to warm up, coolant pressure starts to rise immediately because the closed vacuum valve prevents pressure from escaping as the coolant expands.
With caps that have the open variety of vacuum valve (called “pressure vent” caps), there’s no spring to hold the vacuum valve shut, only a small calibrated weight. When the engine is first started and under light operating conditions, pressure can vent through the vacuum valve. This allows the cooling system to operate at atmospheric or minimum pressure, which reduces strain on the water pump seals, hoses, radiator, and heater core. As the engine starts to heat up, the escaping steam or coolant pushes the vacuum valve up and shut. This seals the system tight and makes the cap function as a constant pressure type of cap.
When the engine is turned off and cools down, a vacuum inside the radiator allows the weighted vacuum valve to reopen. This type of vacuum valve design can also allow the water pump to pull additional coolant into the radiator if the cap is located near the radiator hose that connects to the water pump inlet.
Cap removal & inspection
When changing coolant, performing routine cooling system maintenance or repairs, or when troubleshooting an overheating or loss of coolant problem, the radiator cap should always be inspected.
Do not attempt to remove the cap if the radiator is hot or warm to the touch. Wait until the radiator has cooled, or spray cool water on the radiator until the radiator is no longer hot or warm to the touch (never spray cold water on a hot engine!).
Place a rag over the cap to protect your hand, and then turn the cap counterclockwise (to the left) until it reaches the safety stop (about 1/4 turn). Then pause. Any residual pressure within the radiator will be vented at that point.
Wait until the hissing stops, then press down on the cap so the locking ears will clear the safety stop and continue turning until the cap comes off.
- Visually inspect the condition of the upper and lower sealing gaskets. Replace the cap if the gaskets are cracked, hardened or damaged.
- Look up the pressure, rating specified for the vehicle, and compare it with that printed on the cap. If incorrect, replace the cap.
- Pressure test the cap and cooling system with the Stant 12270 pressure tester. If the cap fails to hold the rated pressure for one minute, replace the cap.
- Repair all cooling system leaks found by pressure testing.
- Inspect the radiator filler neck sealing surfaces for nicks, dents or corrosion that could adversely affect sealing.
- Check the tube that runs from the radiator filler neck to the overflow reservoir to see that it is not loose, cracked, pinched or obstructed.
Safety caps
Stant’s Safety Lev-R-Vent® pressure caps are an excellent replacement alternative to standard radiator caps because they allow pressure to be vented with the flip of a lever.
The lever performs a two-fold function: it interlocks with the radiator filler neck to prevent cap removal until the pressure has been vented and raising the lever lifts the entire pressure valve off the lower seat, allowing steam to vent out through the overflow tube into the coolant reservoir.
The cooling and heating system experts at Stant have dozens of ideas to help you learn more and sell more. Your Stant supplier can provide more information.
Stant Manufacturing Inc.1620 Columbia AvenueConnersville, Indiana 47331 800-822-3121