by Merle Hench 1991 U225 Grand Villa
I went to Lowes today… and, well, yeah – bought a fridge. Price is $379 now, still a bargain I think.
I had help loading it into my pickup but got it out by myself without a fuss and into the garage with a hand truck. It’s very light and easy to handle.
It’s sitting in the garage, for now, plugged in to see how it works. Strikes me it might be really handy right there to keep soda and beers cold while I’m working on the coach. At least until I get to change it out. Got a thermometer in there to see what the temps are when it stops running.
As to noise – I don’t think it’s particularly noisy. All fridges make some noise when the compressor is running. It seems to be about the same as the bigger Whirlpool in my kitchen. Dunno what the fuss is about.
I have the booth dinette in my U225, so my fridge is on the passenger side of the coach, above the central vac. May have to trim a bit from the top, but it won’t need much.
I took some photos of the fridge to help out those wondering about these units; might save you a trip. The only photos I’ve seen show the outside. Now you can see what the inside looks like.
Finally got to the fridge swap in my 91 U225. I have the booth dinette, which means the fridge is on the passenger side above the central vac. Despite measuring everything as well as I could, I was deceived by the flanges and the control panel on the top as to the size of the opening. As you can’t see anything in there until you do remove the old unit, there was no way to know what I had to work with.
The old one came out without a fuss. I took about 45 minutes with a helper. We removed the doors first and got the fridge out the side entry door with a little room on each side. It weighs about the same as the new one. The opening, it turns out, was a shade narrow, which is not a problem, and deep enough, which is good, but 3 inches short in height. No way to open this up without cutting into the central vac compartment.
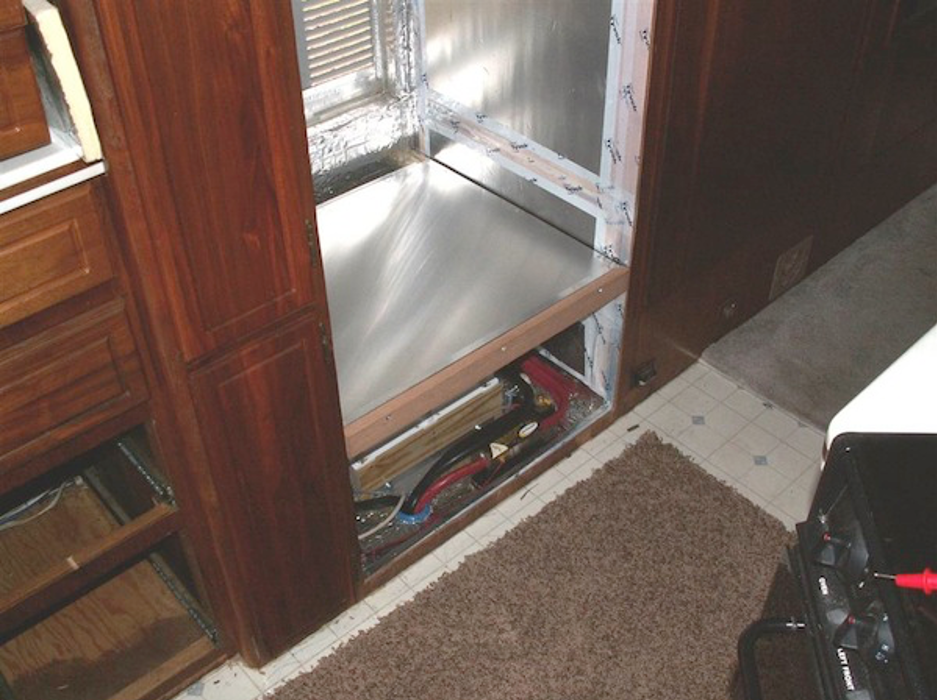
Can’t say I’m all that thrilled with the central vac. Changing the small bags provides a fine opportunity to recite one’s collection of curses, the hose had several splits in it, and filters don’t seem to be available anymore. In considering a possible smaller replacement unit and redoing the space, it seems most folks aren’t very happy with their RV central vacs at all. I have a nice Lindhaus upright in my closet in the house – it was decided it would take the place of the existing unit. The new fridge would now sit on the coach floor, with the remaining space above made into a storage cubby.
Removed the fridge support floor, which is also the top of the central vac compartment. Not much there – a 1-inch pine frame, and two pieces of 1/4 inch luan plywood with a piece of 3/4 inch blue styrofoam in between. That’s all that was supporting the fridge. The tambour door assembly was also removed. What’s left of the face frame will be cut out to provide a 24 inch opening for the fridge.
Now onto something near and dear to my heart – energy efficiency. I was very disappointed to see how this area was insulated. Please see attached pics.
Although 3/4 inch styrofoam insulation was fitted to the sidewalls, it did not fill all the openings. Not even close. Also, as this area is open to the outside air for ventilation, the sidewalls and floor can be classed as exterior walls. As such, there should be a vapor barrier present. What’s there now isn’t doing much of anything.
The plan is to reinsulate this area with foil-faced foam insulation, the foil facing the interior of the coach. All openings and gaps will be filled with expanding foam and trimmed. Then a 6 mil plastic vapor barrier will be added, all the staple rows covered in Tyvek tape. The floor will also have a layer of insulation, and a vapor barrier topped with some 3/4 pressure treated plywood which the fridge will sit on. The lower sidewalls were part of the central vac cabinet (the black plywood panels at the bottom), and as such have no insulation. The panels will be pulled and insulation will be added.
Once the fridge is fitted the gaps all around the exposed area will be stuffed with foam backer rod and trimmed with some walnut to cover the seam. More insulation will be added behind and on top of the cubby opening, which will not be all that deep to leave a ventilation path open. The fridge will be secure by fastening the rear frame to the floor in some manner, accessible via the vent opening.
The propane line will be disconnected at the manifold and everything will be capped. The upper outlet is no longer needed and will be removed. The lower box and receptacle, and junction box, will be replaced and the wiring cleaned up.
Time to get my jigsaw and get busy. More to come.
Some progress made in the last couple of days. The opening has been cut out, old insulation removed and the area cleaned up. Found some Dow Tuff-R 3/4 inch insulation with a foil facing on both sides at a local builder supply outlet. As this material can be used as a vapor barrier, there’s no need for anything else. The panels were glued in and the seams all taped up with Tyvek tape.
At this point what remains is to re-caulk the seams along the outside walls, redo some of the AC wirings, finish the floor, and space will be ready for the new fridge. Then the cubby needs to be finished. More when it’s done.
Been a while since I updated this project; the weather has been a factor (endless rain, it seems), as well as some work where you actually get paid something. Work is almost done to where the fridge can be installed – just need to complete a subfloor.
Although water isn’t supposed to get in there, the lower part of the back wall, where the central vac once was, was walnut paneling and it showed some deterioration from moisture/water entry. Cleaned everything up, recaulked the seams, and spent $12 on a roll of foil faced waterproofing tape. The walnut paneling was covered with foil-faced self-adhesive duct insulation material – had a 1/2 roll laying around, had to cover the paneling with something, what the heck.
All the wiring was encased with split loom tubing, and the electrical was reworked with new receptacles and surface mount boxes (there is enough space at the bottom of the fridge for all this to clear). In the course of wrapping and securing the wire bundles, my exterior outlet popped out the side of the coach. Seems the only thing holding it in there was the paint. Sigh…
Probably a good thing. The existing outlet shows signs of overheating (soot, melting, a crack). This type of outlet, once made by Thomas and Betts, does not need an electrical box and is no longer available (I did not call FT to see if they had any left). I decided to use a box and a standard GFI outlet with an outdoor cover. However, the old cover was larger, which left a big ugly spot. Made an escutcheon plate out of aluminum, matched the paint as best I could with what was available, added some clear coat, screwed it together and sealed the seam with silicone. It doesn’t look too horrible.
The propane line in the fridge bay was in the way of mounting the electrical boxes, so it was cut and capped where it ran flat along the floor. Before I cut it, I disconnected all three 3/8 lines at the propane manifold, put a piece of masking tape over each end, then used some compressed air and an air gun at the fridge bay to blow through the line. The tape blew off at the other end, and I now knew which line went to the fridge. I put a plug in the line and capped the manifold, and tie-wrapped the two ends together to secure them. The other two lines were reconnected. Soap bubble leak test to follow.
So, finally.. the fridge is installed. Apologies for the lousy pics.
Just clears the side entry door of my 91 U225 going in. The fridge doors had to be removed to get it in place – the aisle is too narrow otherwise. Relative to the enlarged opening, it’s a good fit, with about an inch of clearance in the back at the top where the coils stick out the most, and about a 1/8 inch on each side. Found that the doors just swing clear of the cabinets on the opposite side.
All that remains now is turn the space above the fridge into a storage area. Shouldn’t be too much more work. Worth the time and effort. Few more pics when it’s completed.
Had a flash this morning – they seem to be happening with less frequency as I get older.
I’ve been trying to come up with a good spot for the inverter I plan to install. Needed to be near the batteries, but not in the same compartment, and needed ventilation as they can get pretty hot with sustained use. Ding, ding! How about raising the fridge up and using the space below? Already vented, and right on top of the battery bank. Probably the best place in the coach for this.
Glad I haven’t started finishing the space yet. Sometimes being slow to get to things is good.
The fridge seemed ok on the ground, although you need to bend down low to get to the bottom. At the time it seemed easier to build a storage space above with whatever room was left, rather than build a raised floor leaving just enough room to slide the fridge in.
With the side vent and roof, vent airflow will be good, which is why this spot seemed ideal. Might get warm in there in peak summer – if need be, I’ll add some muffin fans to help keep things cool.
The more I consider it, the more I like the idea of the inverter in there. Not only is it close to the batteries, and the space vented, the wiring for the bedroom gen start switch runs through there, so I can tap it to connect the inverter gen start module. Might even be some space left for some odds and ends. We just need to fabricate an insulated cover panel for the opening.
It’s been a number of months since I bought the fridge… but it’s finally installed. Finished.
The inverter was mounted below, where the central vac used to be. That took some time to put together. And as I wanted to add solar, and the power cables would run down the fridge bay, that wiring also had to be done first.
Some initial playing around showed the fridge drew 11 amps at 12 volts from the inverter when first started up. The clear plastic cover over the supplied lamp has been removed and replaced with the recommended LED lamp, making more space in there.
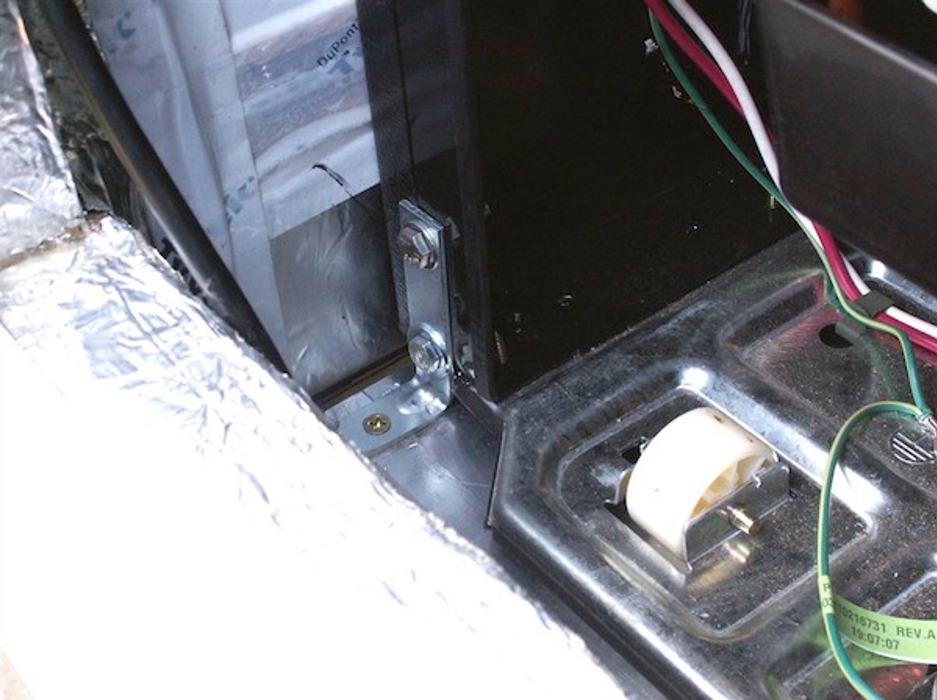
The shelf supporting the fridge was made from 3/4 plywood, with aluminum sheet bonded to it to protect it from moisture developing in the bay. There is a 2 1/2 inch air gap at the back of the shelf to provide airflow for the inverter. Opening the outside access door gives you access to the condensate catch pan in the back of the fridge.
A 3 inch L bracket was attached at the back of the fridge and a heavy screw was then used to attach the other end of the bracket through the shelf into the support frame. This anchored the lower rear of the fridge.
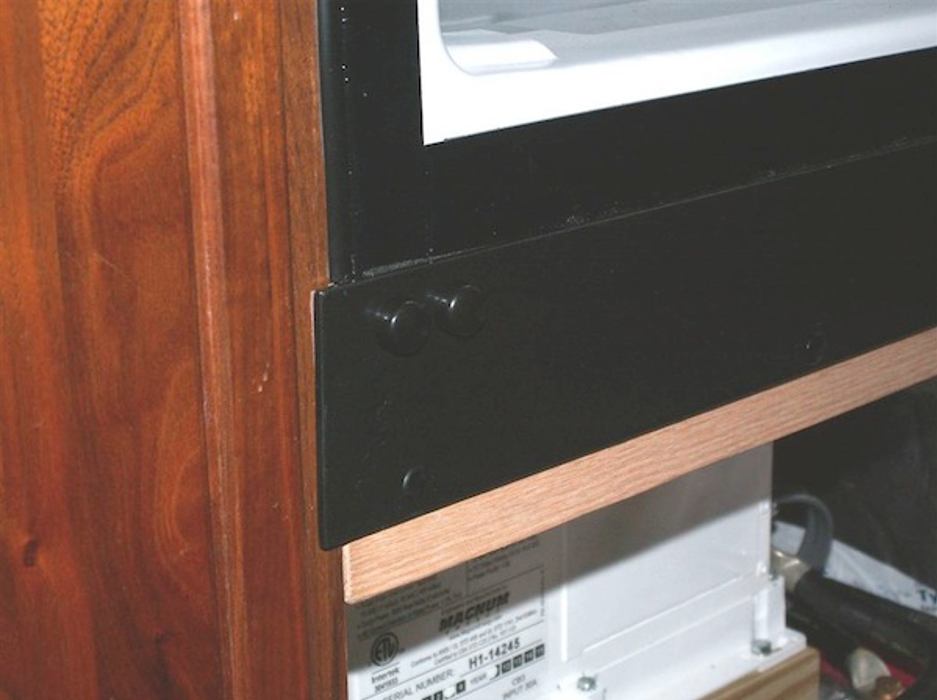
At the front, I fitted styrofoam insulation top and bottom. A stick-on vinyl trim was fitted down the sides to seal the small gap there, and I fabricated two aluminum cover plates for the top and bottom. They were painted with black textured paint to try to match the finish of the fridge. The top plate is secured to the wood above and sits just over the edge of the fridge. A neoprene foam gasket all around provides an air seal. Some screw and bolt covers hide the fasteners somewhat.
The lower hinge of the refrigerator door is secured to one of the front feet by means of a drilled and tapped steel plate, two shims, and two bolts. Both front feet of the fridge have holes drilled in them, which allows the doors to hinge from either side. The shims were replaced by the aluminum cover plate, and the shims were drilled and tapped to provide a means of fastening the trim plate to the other side. So both feet are attached to the trim plate, and the trim plate was then screwed to the front of the shelf. This anchored the lower front of the fridge. With the foam wedged in top and bottom, the fridge is now well secured.
Still need to fabricate an access panel/cover for the inverter, but otherwise, it’s a done deal. Finally.
I’ve done numerous calculations on paper, but I’ve never done this before, so I am not sure how much power I’ll end up using. Too much at first, no doubt, as I’m so used to just having power at hand when I need it. Safe to say I’ll be watching closely going in and developing new habits to reduce consumption. I am adding four 150 watt panels for a 600-watt setup (about all I can fit on the roof and still have access to stuff). Is it enough? Dunno. Much also depends on how much time I spend with the computer and music gear. The solar system should at least keep the fridge running and the batteries topped up. If they drop too far, the auto-gen start module will start the gennie to recharge. No TVs, no icemaker, no washer/dryer, a percolator coffee pot, campfire cooking, and other things will all help in reducing overall energy consumption.
The inverter remote showed the fridge drawing 11 amps at 12 volts after startup. I don’t know if it makes a difference, but both the fridge and freezer were being chilled. My residential fridge runs the fridge/freezer sections independently – don’t know if that’s the case here, but imagine it is, as each section had it’s own temp control.
I have a tower PC that’s a number of years old. I was looking at laptops for a long time, but a big issue is finding one with a Firewire port (other than Macs). Most new laptops don’t have one, or even a card slot or other means of adding one. Gotta have the firewire for my recording interface. I’m just going to put the tower pc into the coach for now. My Kill A Watt meter shows it drawing an average of 200 watts – fair bit more than a laptop, but not too bad. I will probably have to run the gennie when I want to operate the PC and all the rack gear for any length of time – depends on the batteries’ state of charge and how sunny it is that day.