by Lon and Cheryl 1995 U320C SE 40′
Here is what I encountered in the installation of a Bosch counter depth 22cu.ft side by side fridge.
My fridge sits next to the stovetop, and the sink sits down, forward on the counter. The drain, hot and cold water, and vent pipes for the sink run along the floor from the sink to the holding tank that is past the refrigerator compartment. Because of this you have two choices.
1. Bring the refrigerator out and have the pipes run behind the refrigerator. This option forces you to bring the refrigerator forward into the hall area about 4-6″. add to that any additional refrigerator depth from the handles and you could end up with a VERY narrow passageway to the bathroom.
2. Build a 4-5″ tall platform that is over the water, drain and vent pipes and put the refrigerator on top of the pipes. You obviously must have enough height available to do this (refrigerator + height of base). This is the solution I chose. I wanted the refrigerator all the way back against the outside wall so I would not bring the refrigerator and its handles into the aisle that leads to the bathroom. With the 24″ counter depth of the refrigerator, it is comfortably out of the aisle and barely protracts out from the counter depth even with the protruding door handles.
I have not encountered any problems running my residential unit (5 amp) on the 2500 watt inverter for the night. When driving the alternator seems to supply ample power. I installed an on/off switch so if I wanted I could easily turn off the refrigerator if I was worried about draining my house batteries too much, I have never needed to use this option.
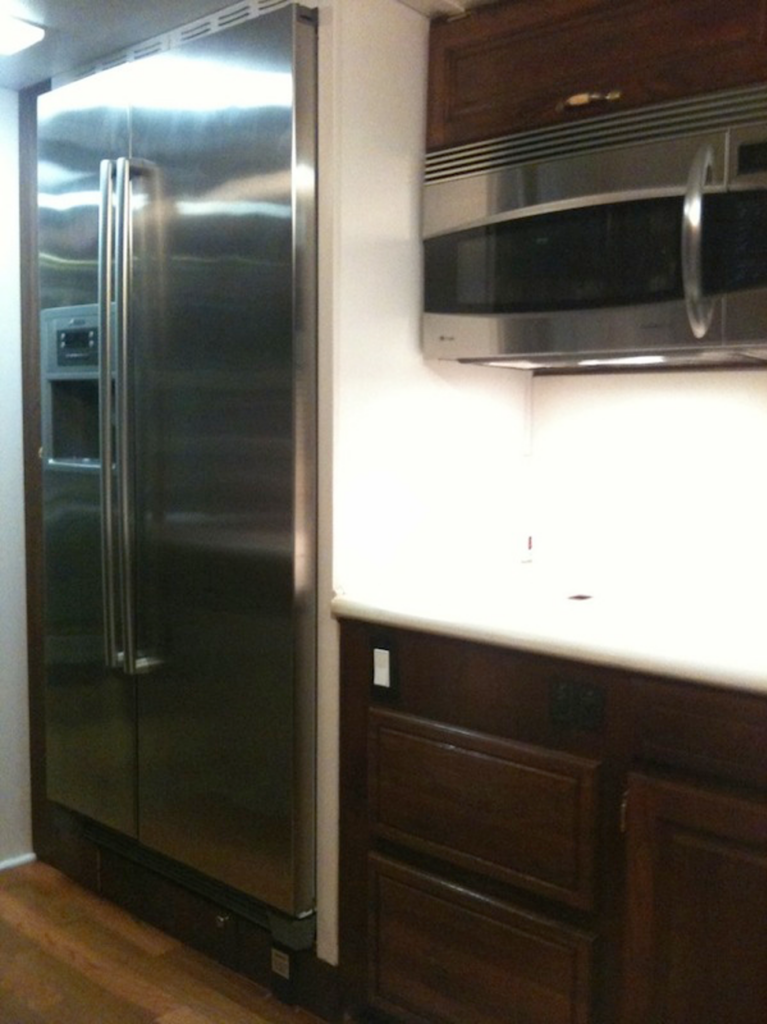
My installation was from a clean slate. There were NO cabinets around the refrigerator and NO dividers to either side of the refrigerator. I just had a big open hole where the old refrigerator and cabinets used to be. The refrigerator fire destroyed everything in that area including the cabinet above the microwave. This probably made my installation easier, I didn’t have to think about how to make the Cabinetry work with the new fridge because there wasn’t any.
As I remember the refrigerator is elevated by the thickness of a 2×4 on end and the thickness of a 3/4″ piece of plywood, there is also a 3/8″ thickness of the hardwood floor on top of the coach floor. This height was enough to raise the platform above the water, drain, and vent pipes that run along the side/rear wall. They do run at a slight angle sloping up toward the sink area. You should be able to see the pipes if you remove the drawers under the cooktop.
Under the refrigerator, I ran bracing with the 2×4’s so the base would properly support the weight of the refrigerator across the coach floor section. I chose to keep the built-in a central vacuum system that is located under the refrigerator. Since everything was out I re-plumbed the vacuum with solid PVC pipe instead of the flexible vacuum hose that was there and leaking.
The central vacuum now works great. I also made sure there was enough area under the refrigerator for the vacuum hose to be stored. Of course, Cheryl doesn’t like to have to get way down there to get to the hose or put it away so the hose will now be relocated to the narrow cabinet I made between the refrigerator and the bathroom pocket door. This cabinet gives me access to the washer water hoses, The 220v outlet for the dryer to plug into and the outlet for the refrigerator to plug into (120v wired to the inverter). As I had mentioned I also put an on/off switch next to the refrigerator under the cooktop so I could easily turn off the 120v power to the refrigerator if needed.

My 1995 U320 has a narrow entrance door. I was able to get the Bosch Model # B20CS80NS/01 into the coach by removing the door, the passenger seat, the door locking knob, and the handrail next to the door. I removed the doors from the refrigerator. This made the cabinet exactly 24″ deep.
With my almost superhuman strength and the help of my stubborn Norwegian /Swedish wife, we were able to wrestle the refrigerator in the coach. The refrigerator did receive a small injury when it attempted to “fight back”, It won’t try that again!
The refrigerator manufacturer required very little clearance at the top or sides in the cabinet that encloses it. I did want to have some space so that the refrigerator had enough room to breathe. So the refrigerator stays put I installed spacers that take up the room between the refrigerator and the refrigerator enclosure. This stops the refrigerator from moving side to side.
To stop it from moving forward off the base and into the hall I secured the bottom of the refrigerator with lag bolts that run through steel L brackets. These sit in front of the wheels under the fridge. So the refrigerator is stopped from tipping forward I installed a spacer that rests at the top back of the refrigerator and wedges against the coach’s roof.
I still have the outside access door to the back of the refrigerator. In the summer I screen it so bugs can’t enter. I think this helps the refrigerator exit heat. In the winter I plug the outside vent with insulation so the refrigerator heat stays inside the coach. This also gives me easy access to the back of the refrigerator so I can get to the ice maker hose. I need to disconnect this in winter and drain it as part of my winterization of the coach.
I also made two “rails” that are equal in height to the refrigerator platform. I can put these on the floor in front of the refrigerator bottom wheels and pull the refrigerator out of the enclosure (after all stops are released) so I can service or clean behind the refrigerator. This gives me about 2′ of service area behind the refrigerator if I were to have plumbing work to do back there with access through the outside hinged vent panel.