N15842F OEM
N15842G OEM
KN23500 SERVICE
Used in conjunction with a turbocharged air compressor the isolation valve gives added fuel economy and greater engine efficiency.
Features
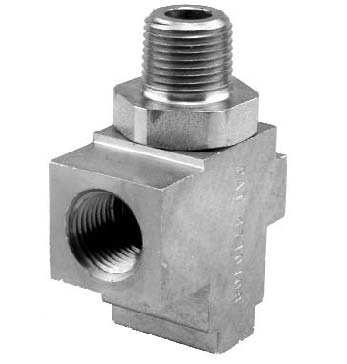
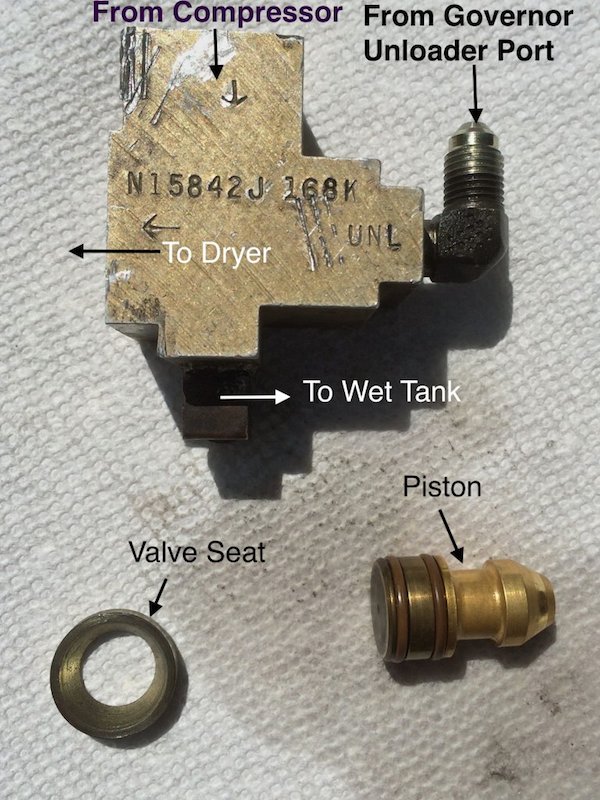
• Port A – To Air Dryer Inlet Port
• Port B – To Pipe Plug
• Port C – To Compressor Discharge
• Port D To Governor Unloader, Height 3/18″
• Volvo 8075792, 70049-0006
1. Remove blocks from wheels and reconnect tractor to the trailer. Reblock the tractor and trailer wheels. Charge the tractor air system. Activate the trailer fill valve in the tractor cab. Observe the trailer brakes applying and automatically releasing as the trailer reservoir(s) are filling (except for dolly applications which may use a non-charging type relay emergency valve).
2. Adjust the trailer brakes.
3. Make several service brake applications, and visually check for a brisk application and release of trailer brakes.
4. Make and hold a service brake application. Check for air pressure leakage at all fittings. A soap water solution liberally applied to the connections is an excellent method to check for air pressure leakage. Tighten fittings if required.
5. Release the service brake application. Place the vehicle park valve (in the tractor cab) in the park position. Observe the full trailer brake application. Place the park valve in the drive (not parked) position, and observe full brake release.
6. Upon successful completion
When working on air system components the following precautions should be observed.
1. Stop engine when working under the vehicle. Always block the vehicle wheels to prevent a fore or aft roll. Bleeding off system pressure may cause the vehicle to roll. Keep hands away from brake chamber
push rods and brake adjusters; they may apply as system pressure drops.2. Never connect or disconnect a hose or line containing air pressure. It may whip as air escapes. Never remove a component or a pipe plug unless you are certain all system air pressure has been exhausted.
3. Never exceed recommended working air pressure and always wear safety glasses when working with air pressure. Never look directly into component ports or direct a pressurized air flow at anyone.
4. Never attempt to disassemble a component until you have read and understood all recommended procedures. Some components contain powerful springs and injury can result if not properly disassembled. Use only proper tools and observe all precautions pertaining to the use of those tools.
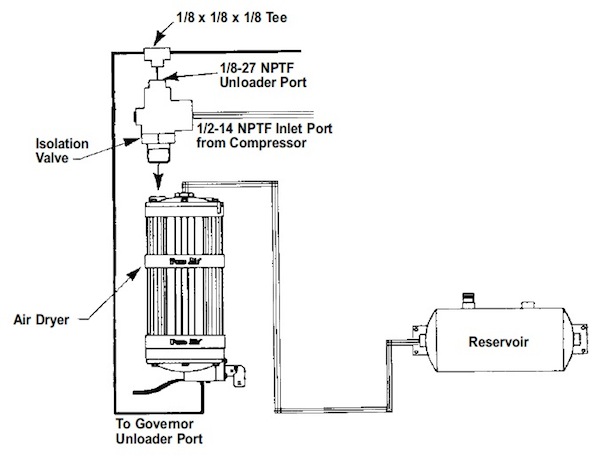
INSTALLATION INSTRUCTIONS
1. The isolation valve should be installed directly to the air dryer inlet port (1/2-14 NPTF external thread screws directly into top of air dryer) with arrow pointing at the air dryer.
2. Connect compressor exhaust line to inlet port of valve. (1/2-14 NPTF internal thread arrow points to valve).
3. Inlet temperature should not exceed 250ºF. A compressor discharge line greater than 6 feet will normally produce temperatures less than 250ºF.
4. Connect a line (3/16 I.D. max., 1/8 I.D. preferred) from top of valve (unloader port) to control line from air dryer.
OPERATIONAL CHECKS:
Once the unit is installed, start the engine, build up pressure to 100 psi and shut off the engine. Check for air leaks at the inlet and outlet of both the isolation valve and air dryer.
Correct any leakage problems.
Restart the engine and build up pressure until the compressor stops pumping. The dryer purge valve opens and immediately expels a large volume of air, followed by a slow flow of air lasting approximately 30 seconds. Shut off the engine and check all connections
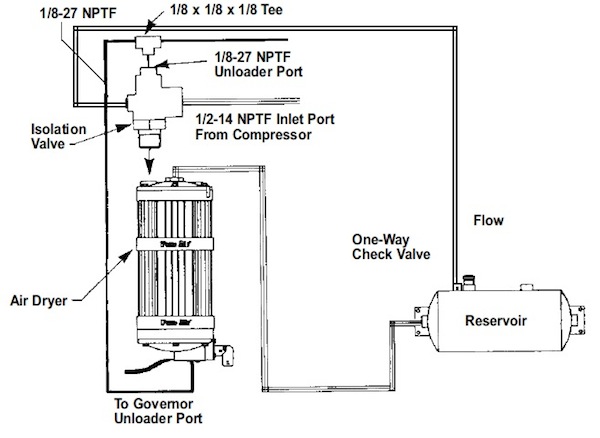
INSTALLATION INSTRUCTIONS FOR CUMMINS/HOLSET MODEL SS338E ONLY
1. The isolation valve should be installed directly to the air dryer inlet port (1/2-14 NPTF external thread screws directly into the top of the air dryer) with an arrow pointing at the air dryer.
2. Connect the compressor exhaust line to the inlet port of the valve. (1/2-14 NPTF internal thread arrow points to valve).
3. Inlet temperature should not exceed 250ºF. A compressor discharge line greater than 6 feet will normally produce temperatures less than 250ºF.
4. Connect a line (3/16 I.D. max., 1/8 I.D. preferred) from top of the valve (unloader port) to the control line from the air dryer.
5. Install a one-way check valve in the top of the first reservoir that is fed by the air compressor. Ensure that air is allowed to flow from the reservoir to the isolation valve. Connect the outlet of the one-way check valve to the 1/8-NPTF port that is opposite the 1/2-14 NPTF internal port on the isolation valve. Note: One-way check valve is a Cummins part only. Part #: 3559522
OPERATIONAL CHECKS:
Once the unit is installed, start the engine, build up pressure to 100 psi and shut off the engine. Check for air leaks at the inlet and outlet of both the isolation valve and air dryer. Correct any leakage problems.
Restart the engine and build up pressure until the compressor stops pumping. The dryer purge valve opens and immediately expels a large volume of air, followed by a slow flow of air lasting approximately 30 seconds. Shut off the engine and check all connections.
It March of 2009 we got a used U320 with 98,000 miles (which we named E3).
In the 3 years that followed I was plagued by a constant rain of goopy oil covering the hitch and toad. At first, I thought it was just from engine leaks/blowby but finally figured out it was coming from the air dryer. During this period I tried just about everything to figure out why the air dryer was spitting oil and get it fixed. Among a lot of other things, I wound up replacing the air compressor twice. I did notice early on that I had a Wabco air dryer and every other FT had a Haldex (or Midland-Grau which Haldex has since acquired).
Took it in again in Feb of 2012 and finally found a mechanic who recognized the problem and figured out that it should have had isolation (also called Econ) valve installed, which it did not. So I started doing some research to answer a lot of questions – like, what the heck was an econ valve, do I really need it, does every other FT have it or need it if I did need it why didn’t I have it, why did I have a Wabco air dryer instead of Midland-Grau, etc.
“I think I am getting close with the air dryer. I am going to pick up E3 on Monday. It has been a great journey of discovery. I know much more about air dryers than I ever wanted to know.
Here is what I think I know now.
My M11 engine and I’m guessing probably all of them had the Holset Type E compressor. The Holset Type E requires the use of an Econ or isolation valve. At that time FOT was using the Midland-Grau N4250 air dryer. I think it may have been available in an “E” version (which would have had an integrated econ valve) but don’t know whether FOT used that or an external isolation valve. Yours used the external valve and it shows on your air system diagram.
In about 1999 Cummins switched to using Wabco air compressors, and the issue went away. That is why Harvey ( who has a 2000 U320) still has the original N4250 air dryer with no isolation valve. At this point, I am wondering if my RV somehow got out of the factory with an incompatible combination – namely a Holset E compressor and an N4250 air dryer with no isolation valve. I checked with the factory and the air system diagram for my coach does not show an isolation valve, so if it didn’t have an N4250E, that would have been a problem. I need to call the factory back and verify the exact model of the N4250 for my build.
I was curious about what a Holset Type E compressor is, so I called Cummins and got someone who was able to point me to Holset. I found someone there who was very helpful.
Here’s an excerpt from my notes of that conversation
Talked to the guy at Holset. Cummins now owns Holset. He knew all about the problem. Finally found the right person to talk to. Cummins used Holset compressors up until about 1999, then switched to compressors made by Wabco, which were lighter and more efficient. Checked Harvey’s engine serial number 34982899 and he had a compressor with Cummins part number 3558163 as original equipment. This is the Wabco type. They are not bolted in replacements. Wabco has some different fittings, I think for coolant. So if I want to replace the compressor I have to stick with a Holset. The non-Type E model would likely be 3047440 “standard 296 (relates to head size, 13.2 cfm model)”.
He said that the SS296 came in both E and non-E versions. The E version was designed to use “engine boost” where the input line is boosted by engine pressure to make it more efficient. But it does suck a vacuum when it is unloaded and so it pushes oil past the rings and down the output line so it needs a special dryer, with an Econ valve. Used to be they added the external econ/isolation valve but this had a problem with freezing up in cold weather so they came out with air dryers that had integrated econ valves, like the wabco 1200E and Bendix drop-in.
I asked about how often he had seen an incompatible combination, E type compr, and standard air dryer. He said he sees it all the time and it didn’t surprise him. Said that some people have replaced the compressor 5 times trying to fix it. It doesn’t show up in stop and goes, where the compressor is working a lot. It only shows up in a long haul on the highway where the vacuum has time to build up.
Apparently very few mechanics are aware of this, so if you somehow acquired this problem it can persist for a long time. I was originally going to just add an external isolation valve but then decided since the old Wabco air dryer had spent so much time submerged in sticky oily goo, it just made sense to replace it. So I ordered a Haldex DA33200x, which is the version with the integrated econ valve.”
As I wrote to Barry in the email above in Feb 2012, the fact that Barry’s air system diagram showed the isolation valve and mine did not lead me to question whether it had ever been installed in the first place. Since then I’ve come to the conclusion that my RV was probably fine when it came out of the factory, with the N4250 air dryer and an external isolation valve just like all the rest of them.
I still don’t know why the diagram for my air system doesn’t show it, but I’m pretty sure it was probably there and disappeared when the Wabco air dryer was put in. I tried to track down the maintenance history to see why the original 4250 air dryer was replaced with the Wabco. I am very curious about that since an air dryer failure is not a common event, but there had been several owners and the information simply was not available. It’s hard to imagine a mechanic doing a replacement, finding an attached part, and throwing it away without understanding what it was and why it was there, but right now that seems to be the only explanation I can come up with.
This problem drove me crazy for 3 years. I believe it is a six-sigma outlier as far as problems go. During those 3 years, I talked to many service facilities and mechanics and did a lot of internet research and never got any closer to solving it until I finally talked to one mechanic who had heard about it. The person at Holset had seen it in the trucking world, but it obviously wasn’t that common there either or that one trucker would not have replaced 5 compressors looking for the answer.
To the best of my knowledge, no other FT has ever had this. It would only apply to the older coaches, 1998-1999 and previous, before the switch to Wabco air compressors. So I don’t think it is a big issue for this group, but it’s a good thing to know about just in case.
Relative to the Haldex air dryer part numbers, I believe the DA 33100 is still the current replacement for the original Midland-Grau N4250. The DA33200 was built to work with the type E compressors and has the isolation valve built into it and so does not require an external isolation valve. At least that’s the way mine is installed, so I hope that’s right. BJ Holden 1998 U320 36′
After reading what BJ has gone through I have some more info to add.
This all transpired after I retired so it took a call or two to get some more info. They had a problem with some of the E series compressors causing the AD-9 dryers to rapid cycle. My friend sent me a link to the bulletin that addresses this problem and maybe of some help to someone that has an AD-9 that has a fast cycle.
He also said that to stop the same type of problem with the Pure Air Plus that they did some porting and added that little valve that you have a question about. At this time it is not a user-serviceable item. I understand that this could change tomorrow. If they ever offer it, it would most likely be in the DQ 6020 lower repair kit. To make things simpler in the future the DA 33200 may be all that will be available as it will work in all applications. Even with this upgraded dryer you still need the isolation valve.
Barry, As I understand it your compressor/governor will never know the difference.
A simplification of what the purpose of the valve is, it seals off the dryer from the outside world when the air compressor isn’t pumping air. (or put another way an upscale check valve) This can be during the time the governor has the compressor kicked out or when the engine is shut down.
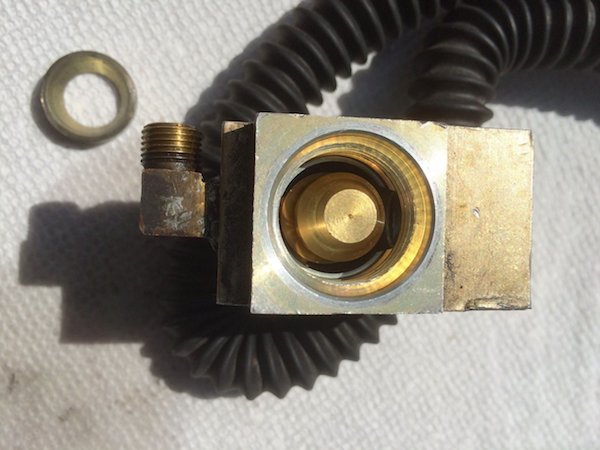
As a side note, there is a piston inside that has 2 o-rings and if they are bad then you can have an internal air leak that you can’t find with bubbles as the air escapes backward through the system. Years ago there was a rebuild kit for those that contained a new piston, rubber seat, & o-rings.
If you had an Isolation valve and it was removed here are some random thoughts in no real order of importance:
There should be a 1/4″ line that comes off the top of the wet air tank that should be close to the dryer. This would have a plugin and may have been hidden in one of the looms. They may also find a plugged line that comes from the governor’s feed. These are what moves the piston inside the isolation valve.
If there is no check valve between the air dryer and the compressor there is a chance that when the governor unloads the compressor, the compressor is “breathing” through the dryer rather than back through the intake. If this is the case then you could have an excessive amount of oil coming from the purge on the dryer.
Some applications I have seen (on trucks) used a simple check valve.
If a shop changed out the dryer rather than rebuild the old one I can’t see why they wouldn’t question what the airlines that make the isolation valve work are for. They would have to remove those lines to get the dryer out. Just looking at the isolation valve you can tell that it is more than just a standard pipe fitting. Pamela & Mike 1997 U320
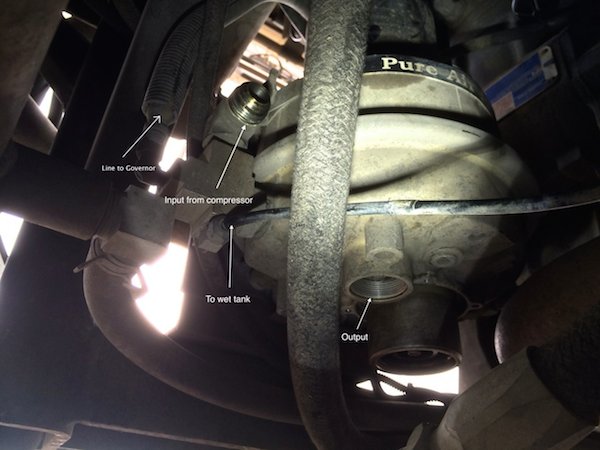
Isolation Valve – Air Dryer Connections
Don and Tys 1999 U270 36′
I was under our coach today and noticed a metal tag on our reman air dryer:
Haldex-Midland
Part # DA33100X
0511
Remanuf
Barry and Cindy 1997 U270 36′
I just finished replacing the air dryer in our 2003 with a remanufactured Haldex-Midland Part # DA33100X.
We have always done the service kits as required but this time we decided to swap out the old unit since it was really due for a full rebuild.
We picked up the part at our local Napa for $264 + $99 core charge (I will get the core charge back tomorrow). Looking at the old unit it was certainly time for a rebuild/reman unit. We did not have that Isolation valve on our dryer. Steve Cook 2003 U320 40′