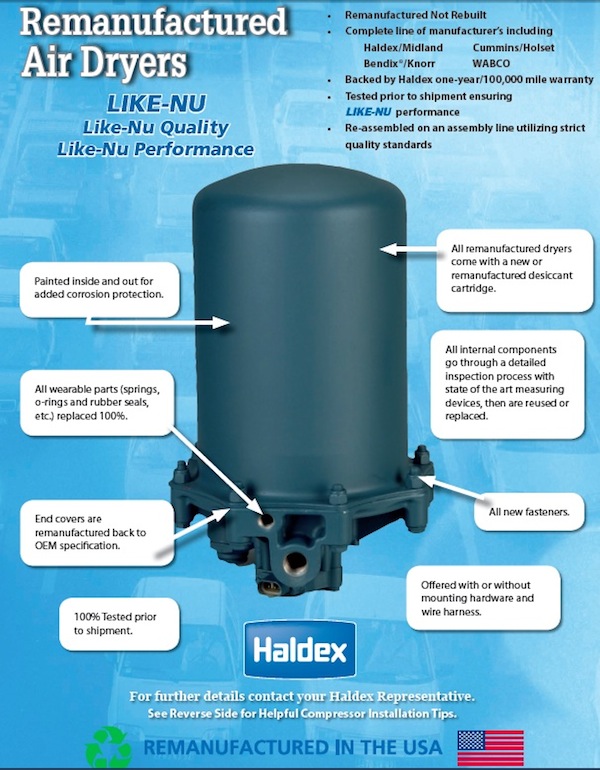
Do’s and Don’ts of Air Dryer Installations
General Information
Always block the vehicle wheels before working on any part of an air brake system. Completely drain the vehicle’s air brake system and leave all reservoir drain fittings open during installation.
Warning
Vehicles equipped with Holset E and QE type compressors must have a compatible air dryer so the compressor WILL NOT pass oil. The compatible dryer must maintain pressure in the discharge line while the compressor is unloaded, or an Econ Valve and check valve must be used in the system. For dryer application questions please call the Haldex
Technical Service Department at 1-800-643-2374.
Installation Instructions
1. Mounting the air dryer
a. Most air dryers will mount vertically with the purge valve facing the road. (Please call the Haldex Technical Service Department if you have questions on how your dryer mounts.)
b. Mount the air dryer as close to the supply reservoir as possible.
c. Do not mount air dryer by heat producing sources (exhaust).
d. Make sure to have proper clearance from all moving parts when mounting the air dryer.
e. Do not mount air dryer in the direct path of wheel splash.
f. Make sure to have adequate clearance for servicing the air dryer.
2. Discharge Line
a. A minimum of 1/2 inch diameter airline must be used for the discharge line.
b. The discharge line should be a minimum of 8 to 12 feet in length.
c. The discharge line should have as few bends as possible and no bends should be less than 2 inch radius.
d. The discharge line must be free of traps and have a continuous downward flow to the air dryer.
3. Purge Control Line
a. The airline used between the air governor and air dryer must be a minimum of 3/16 inch diameter.
b. Always plumb the control line to an unused unloader port (UNL) on the air governor.
c. The control line should have a continuous downward flow to the air dryer.
4. Wiring the Heater/Thermostat
a. Determine the voltage of the vehicle and make sure the air dryer is of the same voltage.
b. The heater/thermostat will have a 2 wire lead. One wire must be connected to the power from the ignition
switch. (A 10 amp fuse should be installed into the hot wire.)c. The second wire must be attached to a ground on the vehicle. (NOT THE AIR DRYER.)
d. If a long lead is needed, use 14 ga wire and make certain all splices are water proof.
e. Tie wrap or support the electrical wire to the air dryer.
Testing the Air Dryer
1. Close all reservoir drain cocks.
2. Build up the air brake system to governor cut out pressure and the air dryer should purge with audible escape of air out of the purge valve.
3. Apply and release the service brake to reduce the air pressure until the air compressor cut-in. The compressor should once again build up to governor cut out pressure and the dryer should purge.
4. Check all new connections for air leaks.