by George Hatfield 2003 U295 36′ 8/ 2/12
Well, if you ever want to remove your valves for service, here are some pics from my efforts. Here is how I did this…
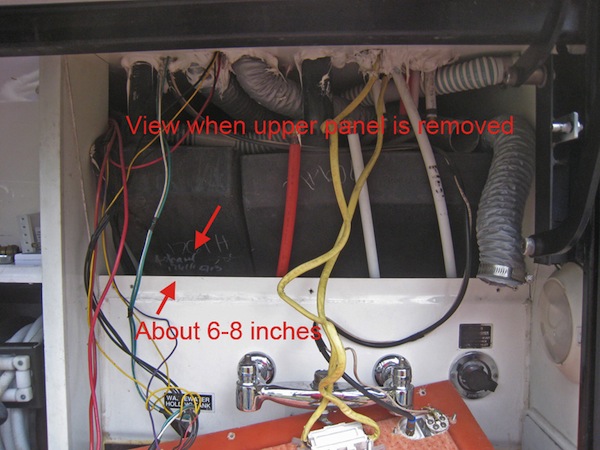
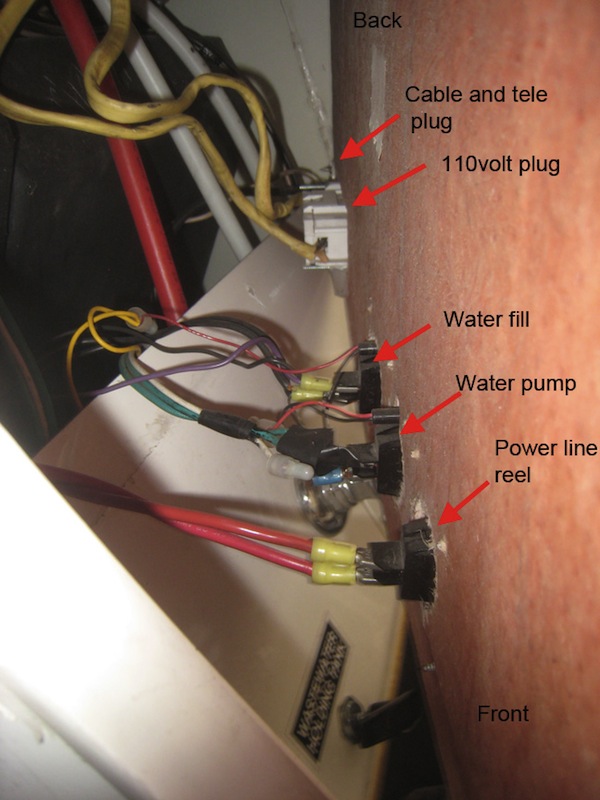
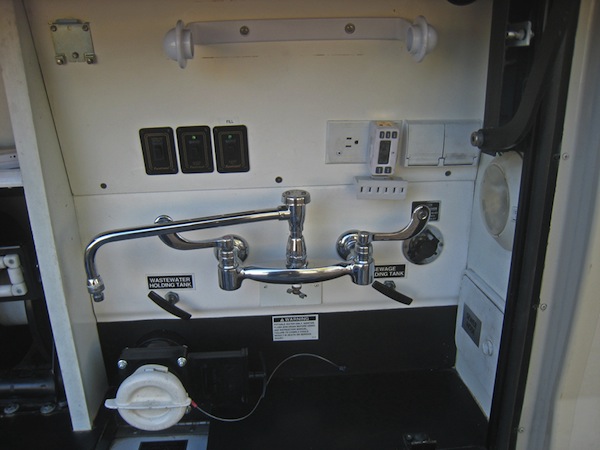
1. Remove top panel…three screws. This panel has three switches (at least on my coach) plus a 110v plug, and a plug for cable TV and a phone line. The switch wires are easy to remove and the rest can be removed with not a lot of effort. See photo. To get this panel out I needed to remove the faucet spout and the hot water handle. The panel can pivot at the right-back corner….pull the left corner out and then once the faucet is cleared, it can be removed.
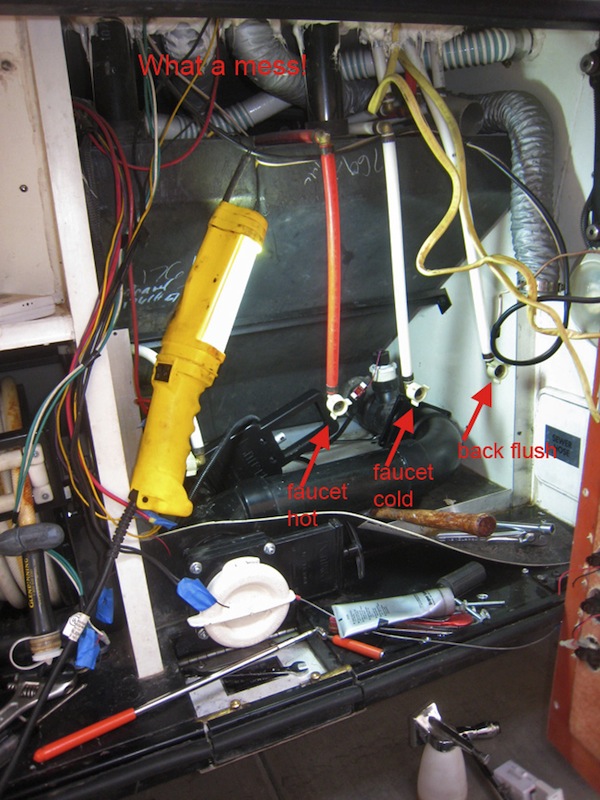
2. Remove the bottom panel….four screws on the bottom. It also has connections to the faucet and to the black tank flush (see pics). Once everything is disconnected, the panel can be pulled up and removed. The area around the sewer outlet is rubber with a split on the bottom. This panel is a pain to take out, but I could not reach the back bolts on the valves without taking it out. On our coach someone had caulked around the edges of the panel…. really is not needed and I will not replace it so I can remove it easier the next time.
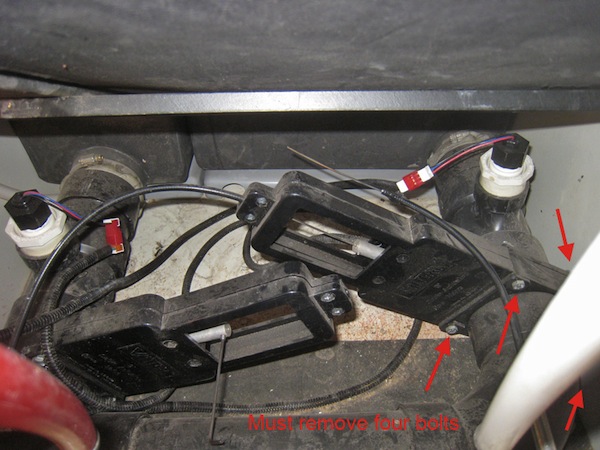
3. Once the panels are removed, the valves can be accessed. The biggest problem in removing either valve is the lower bolt and nut. The other three are easy to remove. A 12″ (or so) a socket extension is a worthwhile tool. Also, you can lift the pipe up a bit (like a 1/2″) with a wedge of some sort so you can get around the bold head with a tool. No doubt about it, this is a pain, but doable. Note that the top two bolts are a bit longer than the bottom two to accommodate the slide holder.
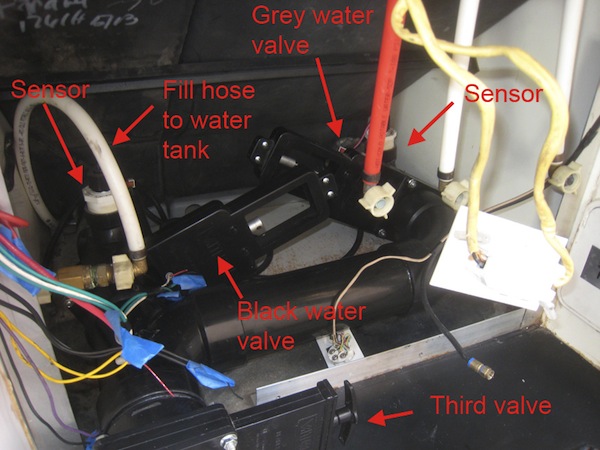
4. Once the valves bolts are out, gently push the pipe apart to liberate the valve. There are rubber gaskets on either side of the valve. I did not remove these. Once out, I lubricated everything that moved, including the shaft with silicone grease. To get to the shaft you will need to remove four more bolts on each valve…easy.
Then it is just a matter of putting it back together. But before doing that, I tested each valve and water connection to make sure I did not have any leaks. I made all the electrical connections such that they could be easily disconnected (i.e., the LED light leads). Also, as mentioned above, I did not caulk around the panels. Not sure why this was done in the first place. If I have a leak, I’d like to know about it!. No sense in sealing it in.
“Here is an addendum to my March 31, 2012 post.
This is a PITA job if there ever was one. I did mine about 1.5 years ago. I actually did them twice. The most important tip I can give you is to get a plumber’s silicone grease. You will find it in the plumbing aisle. It will be in a small plastic container and have the consistency of honey. Do not use any other grease on the sewer valves. I found this out the hard way.
I had to redo the valve job because I did not follow Brett’s advice to the letter and used some of what I thought was a “silicone” lubricant I had laying around on the valves (Super Lube which I know now is not silicone based).
He said to get silicone grease from Home Depot…. there is a difference. I found the grease in the plumbing section of an Ace Hardware here in Asheville. It has the consistency of honey. It was not with the other greases. I pulled the valves, which we’re working very hard, and found a thick greasy residue on everything. I removed that as best I could and used the newly purchased silicone grease for plumbing. The label says 80% silicone, but I am hoping that is good enough.
I found a better way of pulling the valves and rubber seals. If I remove all the bolts on the sewer valves, the whole pipe comes out (i.e., the 3″ pipe connecting the two valves). This makes it a lot easier to remove the rubber seals, clean them and reassemble them. This also allows one to insert the lowest bolt on both valves without too much trouble before attaching the pipe. I put the bolts in from the back on these two since it is easier to attach the nut from the front.”
All in all, not a big job, but worth it I think. At the very least I have a better idea of how everything works.