| Problems | Cause | Remedy | |
| Water drains from the bowl | Nicks or obstructions on Flapperseat. | Replace Flapper, Service Kit P/N 90066-3. | |
| Insufficient Flapper tension | See Flapper Adjustment | ||
| Flapper seal is worn or damaged. | Replace Flapper -Kit 90066-3 | ||
| Water level too high. | Water level control out of adjustment. | Turn Level Adjustment 1/8 turn at a time to raise or lower water level; Clockwise to raise, Counterclockwise to lower. | |
| Fluctuating water pressure | Regulate water pressure. | ||
| Timer malfunction. | Replace Timer -Reference Timer Drawing | ||
| Water continues to run. | Obstruction in water Solenoid Valve. | Remove and inspect Solenoid Valve-see Solenoid Valve Cleaning | |
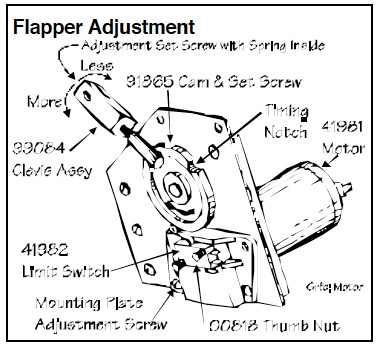
| Toilet continues to cycle after the initial flushcycle is complete -oronly partially cycles. | A cracked cam. | Replace Cam-reference Flapper Adjustment Drawing | |
| Defective Cam Switch; switch out of adjustment. | Adjust or replace Cam Switch-reference Flapper Adjustment Drawing | ||
| Defective Timer | Disconnect either purple wire at limit switch. If the toilet continues to cycle, the timer is defective. If the toilet stops cycling, the limit switch either is not adjusted properly or is faulty. | ||
| Water leaking on the floor. | The hopper has been jarred loose from the bowl. | Reseal Hopper -see Hopper Removal/Reseal | |
| The defective wax ring at the toilet to floor connection. | Replace the wax ring. | ||
| Loose a water supply connection toilet. | Disconnect water line to toilet, add Teflon tape to threads, reconnect. | ||
| No water. | The water turned off. | Turn water on. | |
| Water inlet filter screen clogged. | Clean water inlet filter screen. | ||
| No power to the valve. | Check for DC power at Solenoid Valve during the flush cycle. | ||
| Defective Timer. | Check Timer operation -replace it if necessary. | ||
| Toilet doesn’t activate. | No power. | Restore power. | |
| Tripped Circuit Breaker. | Reset Circuit Breaker Switch. Determine the cause of the tripped breaker if possible before operating the toilet. | ||
| Disconnected wires. | Check all wiring connections. | ||
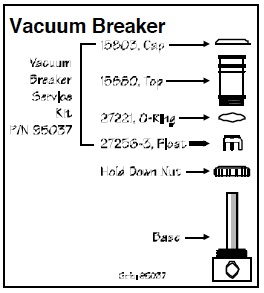
| Water is visible at Vacuum Breaker when flushed. | Insufficient lubrication; Worn vacuum breaker seal. | Service Vacuum Breaker, Kit P/N 95037. |
Service Procedures
Before performing any service procedures, turn off the water and electrical power to the toilet.
Flapper Adjustment
Flapper Replacement Kit, P/N 90066-3
1. Remove the toilet from the floor. Locate flapper operating linkage on the side of the hopper.
2. Remove the clevis pin retaining ring. Remove clevis pin.
3. Adjust as necessary by turning the 3/8″ set screw inside the clevis as required, then replace the clevis pin and retaining ring. Turn clockwise to increase flapper seal tension, counterclockwise to decrease. Inspect the crank arm, clevis and clevis pin for wear; replace if required. Do not turn bolt more than three (3) complete turns.
To Change Flapper Gasket
1. Turn water and air off.
2. Reach behind flapper to grasp gasket tails.
3. Pull tails out of slots to remove the old gasket.
4. Installation is the reverse of removal.
5. Tails must be pulled all the way through to ensure a smooth surface.
Solenoid Valve Cleaning
Solenoid Service Kit, P/N 40037
1. Disconnect the power by removing the two blue wires from the solenoid.
2. Disconnect the water supply line at china end.
3. Remove two screws securing the solenoid to the mounting bracket.
4. Pull solenoid away from the Vacuum Breaker.
5. Remove the water supply tube.
6. Remove four (4) screws from Solenoid Valve Body and remove spring and diaphragm.
7. Clean holes in the diaphragm if clogged. Inspect solenoid for debris and clean. Reassemble in reverse order.

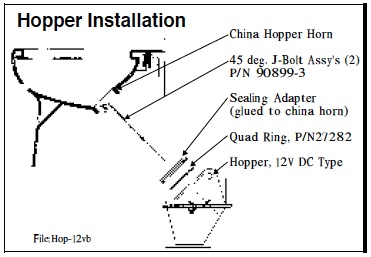
Hopper Removal and Resealing
Hopper Replacement Kit, P/N 24770-3
1. Remove the toilet from the floor. Place the toilet upside down on a sheet of cardboard or other padded material.
2. Remove J-bolts nuts from hopper sides – lift the hopper off.
3. Remove quad ring between hopper and seal adaptor. Check that the quad ring is not damaged, replace the quad ring if necessary.
4. Reassemble in reverse order.
Vacuum Breaker Service
Vacuum Breaker Service Kit, P/N 95037
1. If water is visible at the top of the vacuum breaker during operation, apply some silicone lubricant to the underside of the white float and to the O-Ring located at the upper end of the body.
2. To disassemble the vacuum breaker, remove the snap-on cap and unscrew the body from the bracket. The white float inside can now be removed.
3. No service procedures are required for the lower portion of the vacuum breaker.