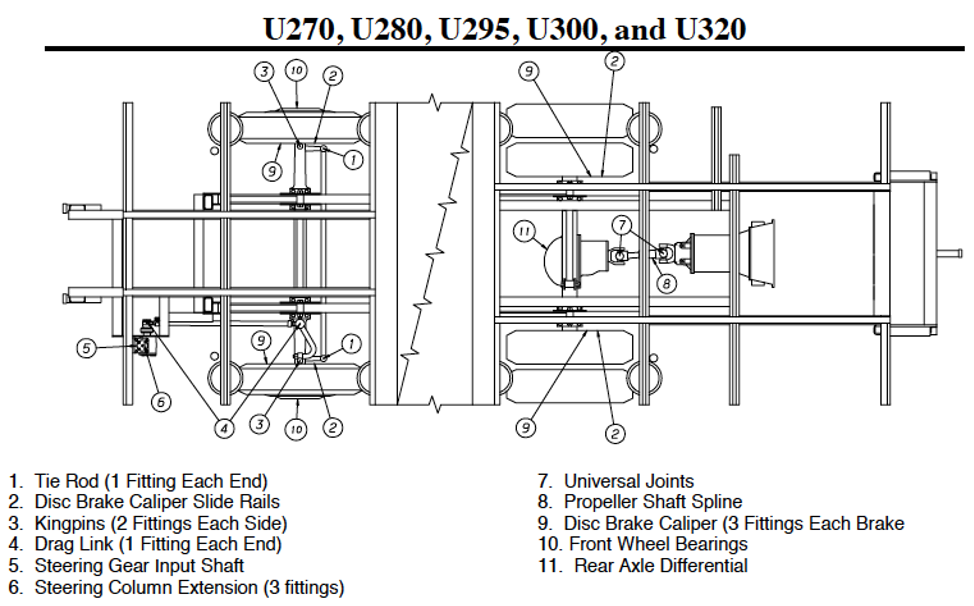
Use NLGI-2 Extreme Pressure Lubricant Grease or equivalent. For best results, apply when the grease is at room temperature.
Front Axle King Pins: Make sure tires touch the ground. DO NOT RAISE THE VEHICLE.
Lubricate the kingpins through the grease fittings on the top and bottom of the knuckle.
Apply lubricant until new lubricant comes from the thrust bearing seal and the upper shim pack.
All other fittings: Maybe lubricated in any position.
Automatic Adjusters on disc brakes: Lubrication should be left to qualified personnel.
by Foretravel Owners Manual
Just had a good talk with Mark Harvey, he is in agreement with me either a dry silicone or just dry slide/guide pins #2 from the Meritor Maintenance Manual 4M. Dave M. 2001 U320 36′
The driveshaft is located on the underside of the RV. This component is designed to transfer engine and transmission torque to the rear axle. The driveshaft is a tube assembly with universal joints positioned at each end, and a slip yoke located in the middle. The slip yoke and universal joints of the drive shaft must be lubricated on a regular basis.
Allow the engine to cool, engage the parking brake and remove the key from the ignition. Never use the hydraulic jack to lift the RV off the ground when performing maintenance. Leave the RV on its suspension and chock all wheels. A large piece of cardboard positioned under the work area will help provide padding, as well as protect the ground against grease stains.
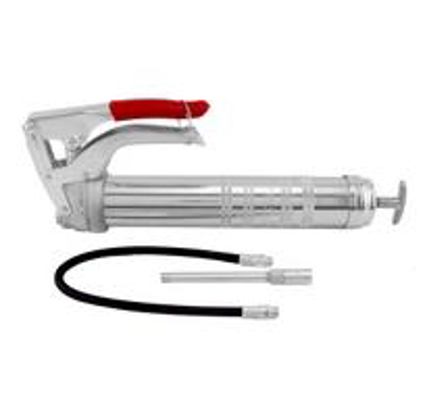
Tools you will need to lube the driveshaft include a pair of coveralls, rubber gloves, a droplight and an ample supply of grease rags. A quality grease gun designed with a handgrip will help streamline the lubrication process.
Inject grease at each of the grease fittings, also known as zerks. There are two joints on each end and another grease zerk on the slip joint of the drive shaft. Some universal joints have two zerks. The universal joints are designed with trunions and four caps.
Start at the front of the driveshaft and wipe away old grease from the zerks. Perform a thorough inspection of the drive shaft. Lack of lubrication can cause metal-to-metal contact and create red particles. Evidence of red metal particles may indicate it is necessary to replace a joint. Carefully examine the universal joints at each cap and the slip joint for signs of red metal particles, and if any are evidenced, have the draft shaft promptly inspected by a qualified technician.
To grease the driveshaft, keep a rag in one hand and grease each zerk using the gun until the rubber fills, or grease begins to extrude from each of the four caps. It is very important to apply liberal amounts of lubricant at these zerks to assure the drive shaft is adequately maintained. Once the universal joints are filled at the front of the driveshaft, move to the back and repeat the process on the rear zerks.
Lubricate the slip yoke by placing a finger over the expansion relief hole located on the universal joint side of the slip yoke. Continue greasing to fill the slip yoke cavity. Air pockets will be replaced by grease, forcing your finger away from the expansion hole.
Lack of lubrication at the drive shaft can cause the slip yoke to stick, creating rear oil seal damage to the transmission output seal. To assure proper operation of the transmission, lubricate the drive shaft according to the mileage requirements listed in your vehicle owner’s manual.
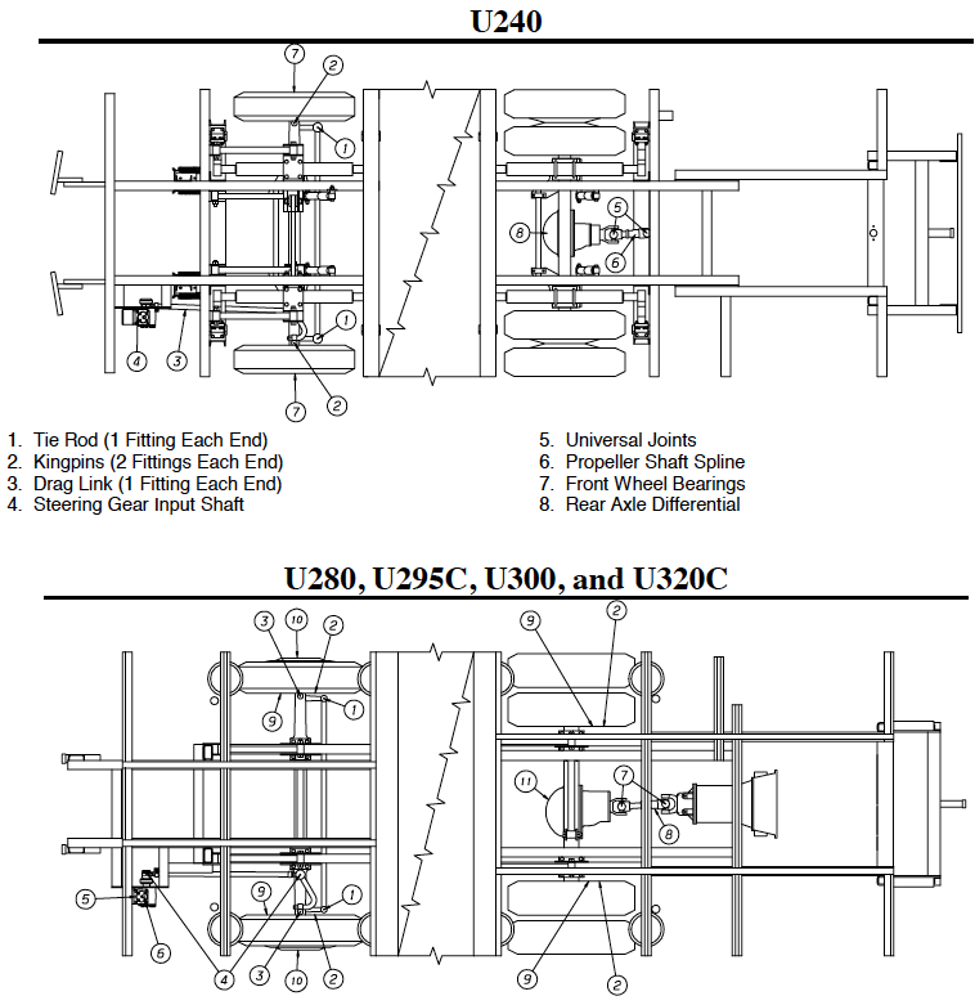
CHASSIS LUBRICATION U240
Use NLGI-2 Extreme Pressure Lubricant Grease or equivalent. For best results, apply when the grease is at room temperature.
Front Axle King Pins: Jack’s front axle until tires are clear of the ground.
Lubricate upper and lower knuckles (both sides), until grease appears.
Lower axle and re-lubricate both lower knuckles.
All other fittings: Maybe lubricated in any position.
Automatic Adjusters on disc brakes: Lubrication should be left to qualified personnel.

by Foretravel Owners Manual
Just had a good talk with Mark Harvey, he is in agreement with me either a dry silicone or just dry slide/guide pins #2. Dave M. 2001 U320 36′
The driveshaft is located on the underside of the RV. This component is designed to transfer engine and transmission torque to the rear axle. The driveshaft is a tube assembly with universal joints positioned at each end, and a slip yoke located in the middle. The slip yoke and universal joints of the drive shaft must be lubricated on a regular basis.
Allow the engine to cool, engage the parking brake and remove the key from the ignition. Never use the hydraulic jack to lift the RV off the ground when performing maintenance. Leave the RV on its suspension and chock all wheels. A large piece of cardboard positioned under the work area will help provide padding, as well as protect the ground against grease stains.
Tools you will need to lube the driveshaft include a pair of coveralls, rubber gloves, a droplight and an ample supply of grease rags. A quality grease gun designed with a handgrip will help streamline the lubrication process.
Inject grease at each of the grease fittings, also known as zerks. There are two joints on each end and another grease zerk on the slip joint of the drive shaft. Some universal joints have two zerks. The universal joints are designed with trunions and four caps.
Start at the front of the driveshaft and wipe away old grease from the zerks. Perform a thorough inspection of the drive shaft. Lack of lubrication can cause metal-to-metal contact and create red particles. Evidence of red metal particles may indicate it is necessary to replace a joint. Carefully examine the universal joints at each cap and the slip joint for signs of red metal particles, and if any are evidenced, have the draft shaft promptly inspected by a qualified technician.
To grease the driveshaft, keep a rag in one hand and grease each zerk using the gun until the rubber fills, or grease begins to extrude from each of the four caps. It is very important to apply liberal amounts of lubricant at these zerks to assure the drive shaft is adequately maintained. Once the universal joints are filled at the front of the driveshaft, move to the back and repeat the process on the rear zerks.
Lubricate the slip yoke by placing a finger over the expansion relief hole located on the universal joint side of the slip yoke. Continue greasing to fill the slip yoke cavity. Air pockets will be replaced by grease, forcing your finger away from the expansion hole.
Lack of lubrication at the drive shaft can cause the slip yoke to stick, creating rear oil seal damage to the transmission output seal. To assure proper operation of the transmission, lubricate the drive shaft according to the mileage requirements listed in your vehicle owner’s manual.
CHASSIS LUBRICATION NIMBUS
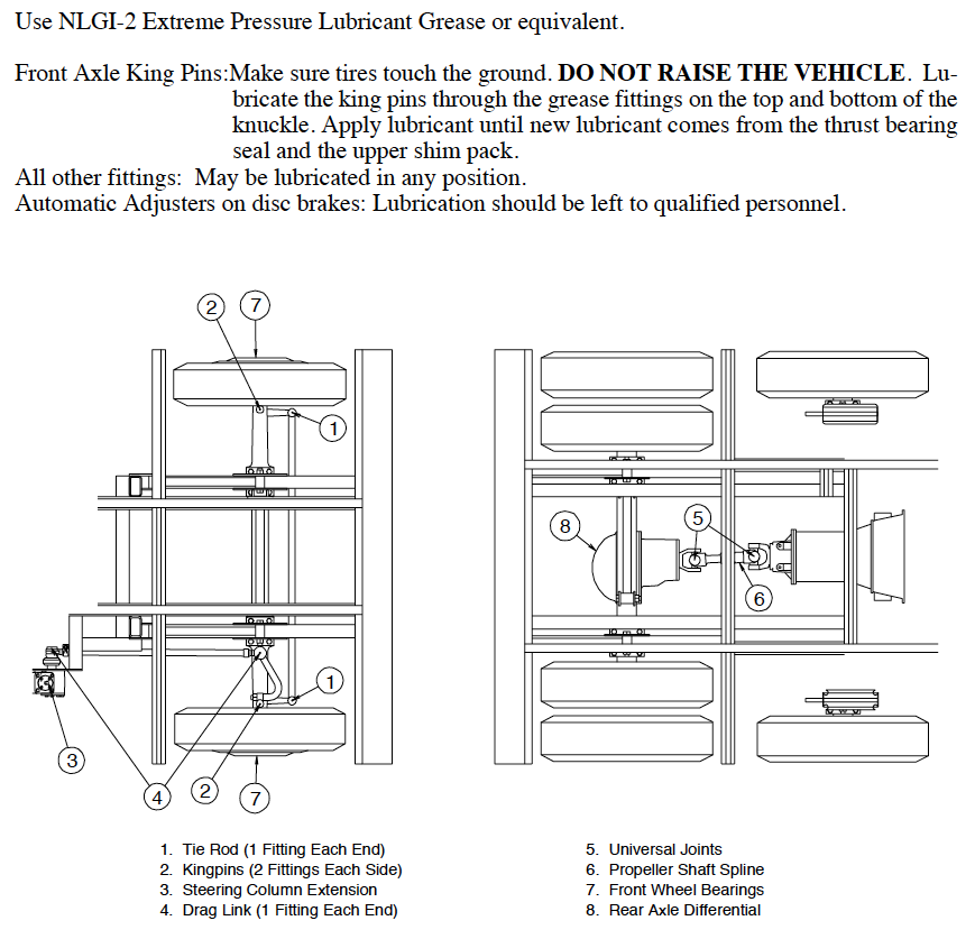
Use NLGI-2 Extreme Pressure Lubricant Grease or equivalent. For best results, apply when the grease is at room temperature.
Front Axle King Pins: Make sure tires touch the ground. DO NOT RAISE THE VEHICLE.
Lubricate the kingpins through the grease fittings on the top and bottom of the knuckle.
Apply lubricant until new lubricant comes from the thrust bearing seal and the upper shim pack.
All other fittings: Maybe lubricated in any position.
Automatic Adjusters on disc brakes: Lubrication should be left to qualified personnel.
by Foretravel Owners Manual
The driveshaft is located on the underside of the RV. This component is designed to transfer engine and transmission torque to the rear axle. The driveshaft is a tube assembly with universal joints positioned at each end, and a slip yoke located in the middle. The slip yoke and universal joints of the drive shaft must be lubricated on a regular basis.
Allow the engine to cool, engage the parking brake and remove the key from the ignition. Never use the hydraulic jack to lift the RV off the ground when performing maintenance. Leave the RV on its suspension and chock all wheels. A large piece of cardboard positioned under the work area will help provide padding, as well as protect the ground against grease stains.
Tools you will need to lube the driveshaft include a pair of coveralls, rubber gloves, a droplight and an ample supply of grease rags. A quality grease gun designed with a handgrip will help streamline the lubrication process.
Inject grease at each of the grease fittings, also known as zerks. There are two joints on each end and another grease zerk on the slip joint of the drive shaft. Some universal joints have two zerks. The universal joints are designed with trunions and four caps.
Start at the front of the driveshaft and wipe away old grease from the zerks. Perform a thorough inspection of the drive shaft. Lack of lubrication can cause metal-to-metal contact and create red particles. Evidence of red metal particles may indicate it is necessary to replace a joint. Carefully examine the universal joints at each cap and the slip joint for signs of red metal particles, and if any are evidenced, have the draft shaft promptly inspected by a qualified technician.
To grease the driveshaft, keep a rag in one hand and grease each zerk using the gun until the rubber fills, or grease begins to extrude from each of the four caps. It is very important to apply liberal amounts of lubricant at these zerks to assure the drive shaft is adequately maintained. Once the universal joints are filled at the front of the driveshaft, move to the back and repeat the process on the rear zerks.
Lubricate the slip yoke by placing a finger over the expansion relief hole located on the universal joint side of the slip yoke. Continue greasing to fill the slip yoke cavity. Air pockets will be replaced by grease, forcing your finger away from the expansion hole.
Lack of lubrication at the drive shaft can cause the slip yoke to stick, creating rear oil seal damage to the transmission output seal. To assure proper operation of the transmission, lubricate the drive shaft according to the mileage requirements listed in your vehicle owner’s manual.