Through heavy use, I found the standard aluminum hinges literally wore out to the point where the hinge had so much play that the hinge paint was being scrapped off from the other leaf (see photo).
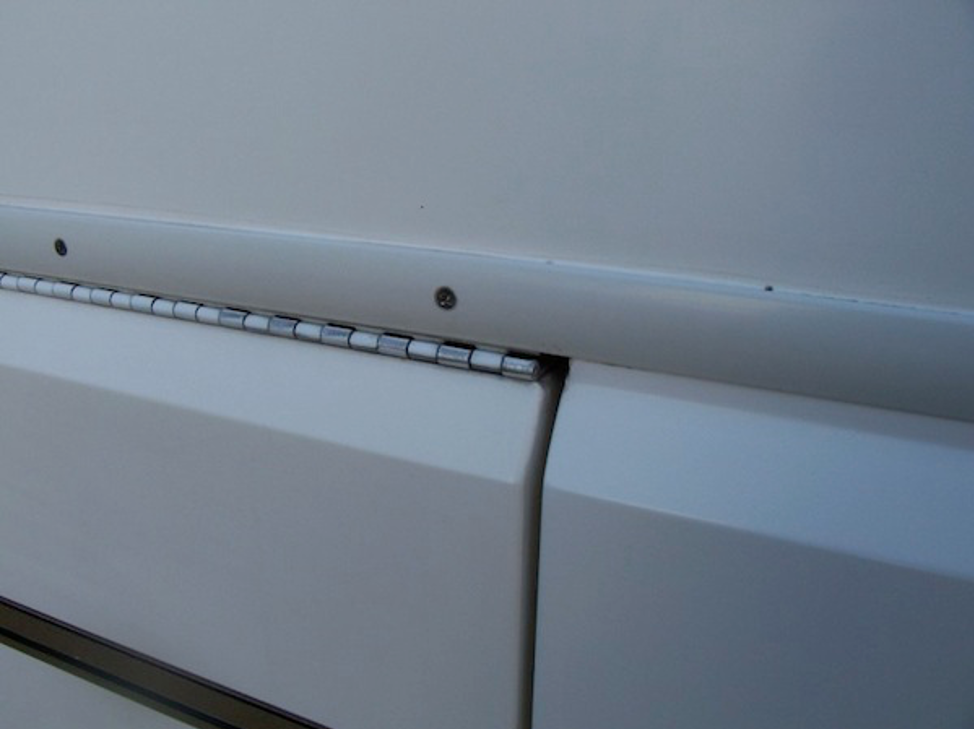
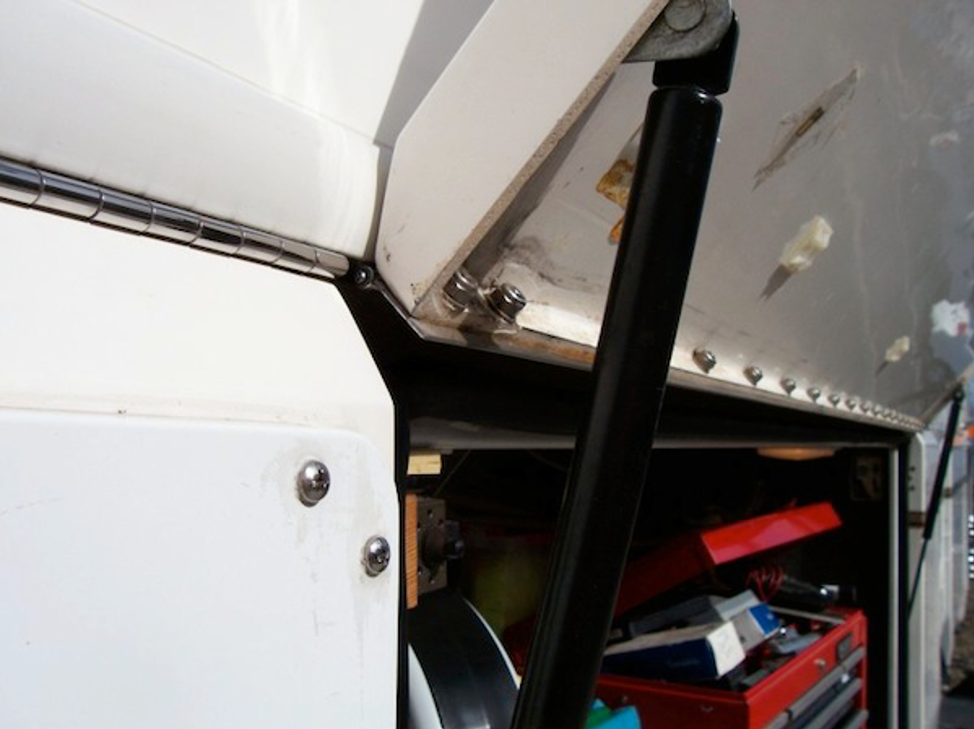
In addition, the connection between the hinge and the door can become loose and work the rivets around and destroy the top flange of the door. It appears that the larger the door the more likely this can occur because the gas spring loads must be carried through the end of the hinge. After buying a new 6 ft door I decide a stainless hinge would be a much better choice for longevity. Fortunately, I could buy a standard hinge and with modification, it would fit just like the OEM hinge. I used nuts and screws instead of rivets – I think they do a better job holding onto the door.
The hinge modification turns out to be the most difficult part. The OEM hinge has one leaf reversed. So for the new SS hinge, I had to remove the center pin, flip one the leaves over, and re-insert the pin. Tools required are a 1/8″ punch, hammer, bench vice, lubricant, and especially…determination! Rotating one leaf as you hammer helps but it slow going. Getting the pinout seems harder than putting it back in. Before re-inserting the pin I ground a slight point to help it find its way into each successive leaf. Lubrication is very important (both directions). Stainless has a problem when it slides against other stainless – it can gall – which is like smudging only the two surfaces lock together – its bad news when this happens.
Lubrication is the answer to galling. Leaf reversing changes the hinge final length so do your final cut of the hinge after. If you’re into the polished look, polish the hinge before installing – it’s much easier. I sand with successively finer grits of sandpaper (100-600) until I can use the buffing wheel.
I next removed the bay door from the coach (requires removal of the trim piece above hinge). I marked where the trim piece holes are on the coach wall. Since I decided I would create new hinge screw locations I had to make sure they were not in the way of trim piece holes.
Removal of the old hinge is straight forward – drilling out the old rivets. The holes in the door will be reused so be careful about drilling. While the door is off I like to wet sand and polish the Gelcoat – especially that top edge where the hinge will be in the way later. It’s a good idea to make a hinge gauge tool before you remove the existing hinge (see photo).
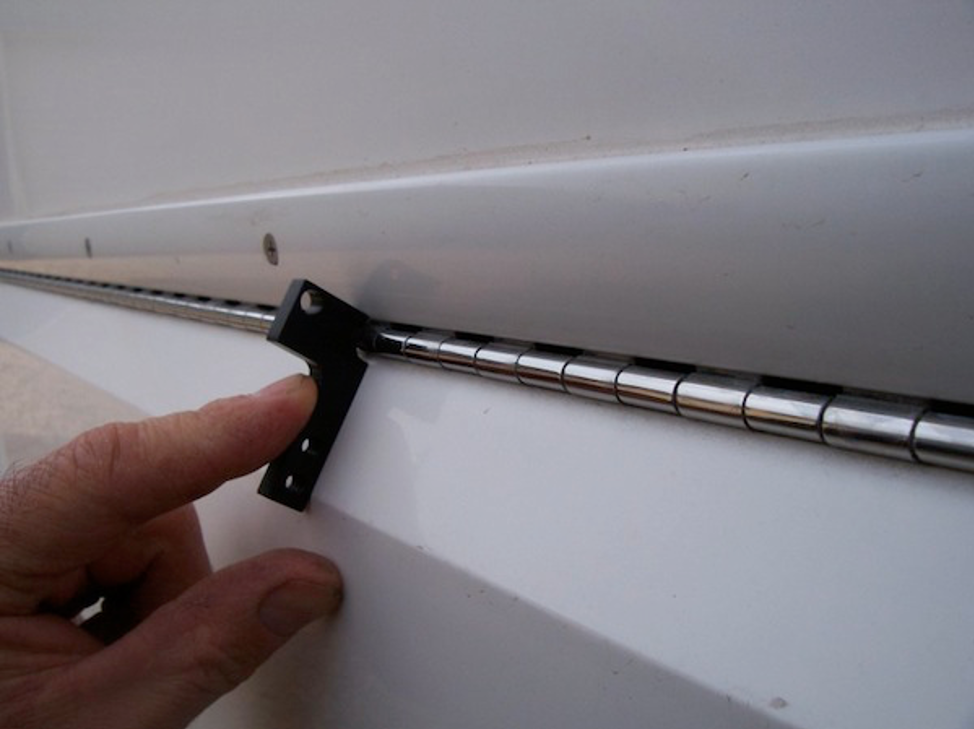
It just a piece of (anything) with the right step height in it. Since you have to drill new holes in the hinge, this tool helps you place the hinge in the same position.
Using the hinge gauge for placement, I transfer marked the door holes on to the hinge face. Since marking and drilling can drift, I drill a little oversized for the #10 screws. I count on the clamping force to hold the hinge in place – not the sheer force of the fasteners. Drilling in stainless is harder than plain steel – good bits made for stainless are well worth getting. On the 6 ft doors, I added polyurethane glue between the hinge and the door to help carry the high shear load imposed by the 120# gas springs. I did this only on the last 4-6″ of each end. In some locations the hole was positioned too close to the door inner wall – so on those, I ground a flat on the washer to make it fit.
For attaching the other leaf to the coach wall you need to position the door (with its new hinge attached to it) in the closed position. This takes a variety of blocks and shims at each end and a helper to help hold it in place. I use the neighboring doors and/or fenders as a guide to the vertical position. Making sure I’m clear of any trim piece holes, I drilled pilot holes at each end through the hinge and the wall of the coach in approximately the same vertical position as the original holes. I installed temporary screws through the pilot holes and verified the door was positioned right. I then drill the rest of the pilot holes.
While the door is still temporarily in place, reinstall the trim piece (using screws on either side of the door) and transfer marked the hole locations on the new hinge. After removing the door I then drilled and countersunk the pilot holes for the permanent screws (same as original). I then drilled clearance holes for the trim piece screws to pass through. Upon reinstallation, I like to put a dab of silicone under each screw head in case there’s a leak that gets through the trim piece. And of course, the trim piece gets silicone under its screw heads as well as its top edge.
An additional detail that I will do on future replacements is to trim the excess hinge that extends beyond the door on the inside. As is, this extra bit of hinge wipes past the bulb seal and scraps the surface rough and will eventually accelerate the replacement of the bulb seal.
The detail picture is of the first door I did, which was about 8 years ago and is still holding good.

Parts list: (all McMaster-Carr p/n’s [McMaster-Carr]( http://www.mcmaster.com/# ) but can be found elsewhere):
Hinge: 1582A341(4ft), 1582A343(6 ft): 304 stainless, 2” open width, 1/8” pin, .060 thick
Screws: 91770A830, 18-8 stainless, 10-32 x 5/8” long, Truss head Phillips
Washers: 98017A640, 300 series stainless, .44 OD (important), #10 screw, .06 thick
Nut: 91831A411, 18-8 stainless, Nylon locking, 10-32 thread by John & Tina Fitzgerald 1991 U300
——————————————————————————————————————-
Here is something else to check for rainwater leaks. Recently I removed the aluminum trim strips that cover the lower bay door hinges to repair a couple of doors. Noticed that the caulk had come loose in about a 2-foot long section on one strip. This trim strip covered the upper door hinge leaf and screws that hold the hinge and also the top edge of the fenders. Several of the hinge screws were rusted out in this area and many of the stainless trim strip screws had little or no holding power. Further examination revealed that there is a piece of wood in the wall which is there apparently to hold the screws for both the hinges and the trim strip. The outer part of the sidewall is a thin fiberglass panel, next is some metal (maybe sheet metal or angle) and the strip of wood. In my case, the wood had experienced dry rot and could no longer hold the screws.
I corrected this problem by using System 3’s three-step Rot Fix kit, which consists of a borate solution to kill the dry rot. It’s called Board Defense, a white powder mixed with water. I injected it with a plastic syringe through the screw holes and waited 2 weeks for it to dry. Kept the holes covered with duct tape in case it rained. Next, I injected their thinned epoxy which is supposed to harden the rotted wood. I waited a couple of days for it to harden because of the cool temperature. Next, I injected “Sculpt Wood”, a 2 part epoxy that has the consistency of “play dough”. This was not easy to do as it was too stiff to flow through the small plastic syringe even after I enlarged the opening. Resorted to pushing it in by hand and using the butt end of a drill bit to pack it in. The good thing about the sculpt wood is that it is slow to harden and there were many screw holes. I waited 2 days before redrilling for the trim strip screws.
If I were doing this job over, I would just inject some undiluted ethylene glycol antifreeze which will absorb any water and kill the dry rot (according to info found on the internet). Enlarge the hole in the wood only, not the fiberglass and metal, by using a stiff wire bent 90 degrees at the end and trimmed short in an electric drill. Next pack in the sculpt wood until the hole is full. It might be possible to inject the sculpt wood by putting it in an empty caulking tube. Empty caulking tubes can be purchased, but I didn’t try it as I didn’t think about it soon enough.
I’m not sure that the thinned epoxy is necessary but certainly doesn’t hurt to do it. It is really supposed to be painted on rather than injected, but there is no other practical way to get to this piece of wood. Behind a couple of screw holes there seemed to be no wood at all, which may be the reason the trim strip pulled loose in the first place. This trim strip is caulked with white silicone at the top after it is replaced. Foretravel also caulked all the screws as there was a small glob behind the trim at each screw.
I do believe that this problem was from rainwater, as I can not find any evidence of a leak inside the coach. There is a similar trim strip at the roof edge and at the front and rear caps.
All Foretravels may not be built this way or have these trim strips. Other companies may make a similar repair system, and System 3 sells the components separately. I had to order the kit, but the local WoodCraft store had the thinned epoxy and sculpt wood. About $40 for the kit or the other components. The kit has a small amount of each of the 3 parts. The thinned epoxy gelled in about 30 min and would have been enough had I not mixed it all at one time. White vinegar will clean the mixing bottle if used before the epoxy starts to harden. Jerry Whiteaker 96 U270 36′
The aluminum hinges on my 1996 U320 are not worn very much, however, three doors in the last year, have torn off the hinges leaving the rivets in the piano hinge and the door on the ground (scratched).
The pressure gas struts have a “90” on them which I believe is for 90 pounds, not 120.
I repaired 5 of the 6 four foot doors and 1 of the 2 eight-foot doors by using “JB Weld” to attach a 3/16 wood dowel to the fiberglass where the rivet holes are and then two layers of reinforcing glass cloth with fiberglass resin. I then used 1/4 inch stainless bolts with nuts and washers. These bolts hold much tighter than the rivets being replaced. I am just replacing rivets with bolts on the doors which were still intact.
After the first door partially tore off last year, I checked all cargo doors and found, aluminum rivets in some doors, stainless rivets in others, and plated steel in others. I also found small bolts added between the original rivets. Most of the rivets had loosened and there was movement between the hinge and the door.
I used 1/4 inch stainless rather than #10 because they are readily available and a little stronger (stainless bolts are weak compared to steel bolts).
Cargo doors look and work well now. Wyatt 96 U320 40′