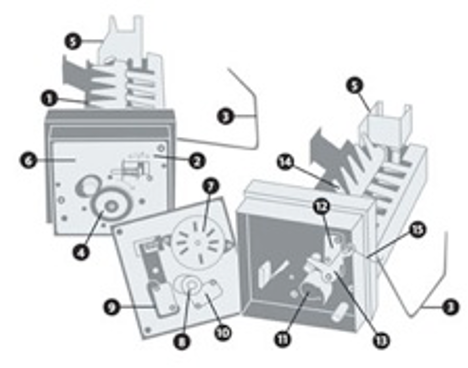
Ice Maker Parts
1. Ice Mold
2. Water fill adjustment screw
3. Ball arm
4. Gear
5. Water fill tube
6. Metal faceplate
7. Harvest motor
8. Microswitch timing cam
9. Water fill switch
10. Holding switch
11. Internal mold thermostat
12. Shutoff switch
13. Shutoff switch lever
14. Ejector paddle
15. Bail spring
At least three companies have marketed a stand-alone, built-in ice maker for the RV industry. The first serious effort was a product that carried the Instamatic label and was equipped with a 120-volt-AC Freon compressor unit made by U-Line Corporation. The second product was nearly an identical machine sold under the Dometic label that also was equipped with a 120-volt-AC Freon compressor unit made by U-Line. The third ice maker was a unit produced by U-Line and marketed under its own label. (At one time, Dometic made and marketed its own ice maker, but it was discontinued several years ago.)
U-Line is the only company today that sells stand-alone units, with several models available. Some years ago, 12-volt-DC models were manufactured, but they did not perform well, and the advent of high-efficiency inverters negated further development. A few years back, a different style ice maker appeared at the big box stores. This relatively inexpensive, the portable 120-volt machine does not have an automatic fill. Instead, it requires that the user pour the necessary water into a tank before the machine can make ice.
Norcold and Dometic both market ammonia absorption refrigerator/freezers (gas/electric) that are available with optional ice makers in certain models. In these setups, the ice maker does not require its own cooling unit, since it operates within the freezer environment. However, the harvesting part of the mechanism must still have 120-volt-AC current to operate. Dometic previously offered a model that had augmented freezer cooling supplied to the immediate area of the ice maker with the addition of a 120-volt-AC Freon compressor unit; however, the added cost of this style ice maker approached that of the stand-alone ice maker.
The amount of ice produced varies with the style of the machine. The stand-alone unit will produce the most ice, but it requires a constant supply of AC voltage to keep the freezer cold after the ice is made. A stand-alone machine can produce an ice harvest every 20 to 40 minutes, or 36 to 72 harvests per day. The compressor-augmented refrigerator, previously produced by Dometic, would do the next best job, with a harvest every 30 to 50 minutes. The absorption-only models (the most economical style icemaker) will produce the least amount of ice of the three styles, with a harvest every 90 minutes to three hours, or eight to 16 harvests per day.
Depending on the size of the “cubes” being made, each harvest will yield approximately 4 ounces of ice, so it would take four harvests to make a pound of ice. The term cube is used with reluctance for a lack of a better word to describe the semi-cylindrical shape of the ice produced in the ice maker.
It should be noted that these ice production numbers are based upon my personal experience and do not represent the claims of the manufacturers. I have provided these figures only as an aid in comparing one style to another. The actual ice production of a particular unit may differ because of slight variations in individual components, ambient temperature, and ventilation. Also, keep in mind that the ice maker must share cooling capacity with other heat loads. The cooling unit of the refrigerator has a limited capacity. It can extract only a certain amount of heat over a fixed period of time. The ice maker must, therefore, share that capacity with the balance of the items that need to be frozen. For instance, if you place an unfrozen article in the freezer, the cooling unit will be extracting heat from that item as well as from the unfrozen water, and thus more time will be required to freeze the water. Frequent door openings, extreme indoor and ambient temperatures, and poor-fitting door gaskets all can contribute to low — and slow — ice production.
The advantage of the absorption refrigerators with ice makers is that they do not require constant 120-volt-AC current, as the absorption cooling unit will keep the ice from melting; however, they do require 120-volt-AC current for three or four minutes while harvesting the ice out of the mold after the water is frozen. They also save the space in the galley that would be occupied by a stand-alone ice maker.
As stated earlier, the quantity of ice produced can vary widely. To measure ice production, remove about half the ice from the bin, cover the remainder with a paper towel, and count the number of cubes produced in a 24-hour period. Each harvest will yield either eight cubes of 3/4-inch width or 12 cubes of 1/2-inch width. Or you may count the number of fingers on the ejector paddle to determine the number of cubes per harvest. Dividing the number of cubes per harvest into the total number of cubes produced in 24 hours will give the number of harvests per day.
With very few electrical and cosmetic changes over the years, the ice maker mechanisms all function in the same manner. Here is a description of what happens during a complete ice maker cycle.
With water in the mold, the freezer cabinet temperature reduces the water temperature until the water freezes. The colder the mold, the faster the water will freeze. The internal mold thermostat — made to close at 15 degrees Fahrenheit and to open at 48 degrees Fahrenheit — reacts to the appropriate mold temperature. This closes the contact points, which passes current to the harvest motor and the 165-watt mold heater. The harvest motor turns a gear that rotates the microswitch timing cam, which in turn rotates the ejector paddle. The motor stalls out as the ejector paddle fingers contact the ice awaiting the mold heater to warm the bottom of the mold and loosen the ice. The harvest motor is a “stall” or “hertz” type motor that is designed to stall out under power without burning out its windings.
When the ice loosens, the motor begins rotating the cam and paddle, moving the ice out of the mold, tripping the holding switch, turning off the mold heater, lifting the bail arm, and pushing the ice out and over to dump into the ice bin. The cam and paddle continue to rotate, lowering the bail arm. If the bail arm hits the ice on its way back to its resting place, this will signal that the ice bin is full, which keeps the shutoff switch open to prevent the start of another ice cycle.
The cam and paddle, now in their second rotation, will momentarily close the water fill switch, activating the water solenoid valve, and allowing water to flow into the mold. This will thereby warm and reset the mold temperature thermostat. The residual warmth of the mold heater also aids in this process. Completing the cycle, the paddle comes to rest at the 9 o’clock position as the cam relieves the holding switch to turn off the motor and await a new command from the thermostat to start another harvest cycle after the water is frozen.
Troubleshooting
When the machine fails to produce ice, a few basic elements should be investigated:
1. Is the freezing compartment cold enough? If the temperature isn’t below 15 degrees Fahrenheit inside the freezer, the ice maker is not going to produce any ice. The water may freeze, but the internal thermostat will not start a harvest cycle until the mold temperature is below 15 degrees. A temperature of 0 to 10 degrees Fahrenheit would be favorable for acceptable production. An insufficiently low freezer temperature could be caused by a host of problems with the refrigerator, and a trip to a service center might be in order. For models with a compressor, check to see that the compressor and fan are operating and investigate whether lint has accumulated on the condenser. If the condenser can’t get rid of the heat, it cannot operate efficiently. Clean it with a vacuum if it is dirty. The freezer cabinet thermostat for the ice maker controls the current to the fan and compressor. Some models have an adjustable thermostat, and those are normally difficult to access, for obvious reasons.
2. Is water filling the ice mold? Use a flashlight to see whether water is being delivered to the mold. No water, no ice. There may be a blocked filter in the water supply line, an obstructed flow control washer at the water solenoid valve, an inoperative water valve, or a bad water valve micro switch. Totally defrost the freezer to ensure that the fill tube is not obstructed with ice or frost. If there is a shutoff valve for the ice maker, be sure it is open.
3. Is ice present in the mold, but the mechanism fails to initiate a harvest cycle? Again, look with a flashlight. This is the toughest situation to diagnose, as there may be multiple problems involving the two other micro switches, the internal mold thermostat, and the harvest motor. All of these items must join hands at the appropriate time to initiate and to complete the harvest cycle. One interruption and the entire process will break down.
4. Are the cubes too small, or are they all linked together? This is caused by the duration adjustment of the water valve micro switch and is an easy problem to fix. Remove the white square cover on the front of the mechanism, using the coin slots on the edges to pop it loose. There is an adjusting screw on the metal faceplate with “+” and “-” marks indicating the direction to make the adjustment. Turn the screw only one full revolution, and observe future harvests. A second or third adjustment might be necessary.
You may be tempted to remove the metal faceplate from the mechanism in an attempt to check out the micro switches, the motor, or the thermostat. Should you do so, be forewarned that there is an excellent chance that you will not be able to reassemble it correctly. Also, don’t forget that behind the faceplate are connections that are “hot” with 120 volts AC if you neglect to disconnect the electricity and/or turn off the inverter. In addition, when you remove the faceplate, the spring that holds the bail arm will probably fly across the room. If you can find it, three hands may be needed to hold the spring and raise the bail arm while the ejector paddle is rotated to mesh with the cam (without bending the shutoff switch lever as the faceplate is pushed into place), also nesting in the end of the bail arm. Are you getting the picture? I am suggesting that you do not remove this plate.
Aside from checking the water path, determining the presence of 120 volts AC at the receptacle, cleaning the condenser, and defrosting regularly, there isn’t much else you can do to repair a faulty unit unless you are very mechanically inclined. However, being able to supply reliable information to the technician relative to what is and isn’t happening will shorten the diagnosis time. Repair time often is quite lengthy, as the technician will need to test the unit through a few complete cycles, which may take several hours. If additional action is necessary, more test time may be involved. The technician need not be standing there waiting all this time, but your ice maker will have to be there. If the ice maker is in your motorhome, then your motorhome will be tied up for that period of time as well. Plan to leave it for a few days.
With today’s labor rates, it may cost more to have the ice maker repaired than to have it replaced. You can obtain a firm estimate on the cost of replacing the mechanism, whereas estimating the repair costs usually involves a large variable. Carefully weigh your decision to repair, as a replacement might well be the wiser choice.
Should you detect black flakes in the ice, take this as a signal the mold coating is deteriorating. This coating consists of a nonstick material, such as Teflon, that allows the ice to release from the mold with a minimum of pressure from the ejector paddle. It also protects the zinc alloy mold casting from oxidation. When the coating begins to loosen from the mold, little pieces may tear off and come out with the ice. The mold can be replaced, but the mechanism must be totally disassembled, and the additional labor will outweigh the price of a complete mechanism.
Periodic defrosting will be necessary at a frequency influenced by the humidity, the amount of ice produced, and how often the door is opened. The weight of the ice, the frosting, and the time span eventually will make the ice in the lower section of the ice bin all stick together. Break up or discard this chunk during defrosting.
For winter storage, it is best to remove the water lines from both the inlet and outlet sides of the water valve. Allow the lines to drain into a cup or a towel. Introducing antifreeze into the ice maker is a disaster. It takes an eternity to get the stuff out of the system, since only a few ounces of water will flow through with each cycle, and usually disassembly is necessary to flush the complete water path adequately.
If you temporarily need a little extra freezer space, don’t forget the ice maker. A small package will keep very nicely in the bottom of the ice bin and still allow ice production. However, you should never store articles on top of the ice unless you raise the bail arm. Failure to do so may obstruct the movement of the arm during the next harvest cycle, and this could damage the unit. Because moisture is introduced into the freezing compartment from the water flowing into the ice mold, frost is going to accumulate.
Be sure to leave the freezer or ice maker door ajar when storing the motorhome — even if only for a few days. Warm, humid air trapped in the cabinet can corrode the switches and other mechanical parts, inviting a failure.
Understanding how your ice maker functions should add to the satisfaction you derive from this unit and help to keep it operating properly and most efficiently.